Discover the ancient technique of creating stunning pieces using crushed glass paste. This method, known for its intricate details and vibrant colors, has been revived in modern studios like The Crucible.
Whether you’re a beginner or an experienced artist, this guide offers a hands-on approach to mastering the craft. You’ll learn how to create sculptures, bowls, and decorative objects with ease.
Safety tips, historical insights, and class options are also covered. Dive into the world of glass art and explore the endless possibilities this technique offers.
Introduction to Pâte de Verre
Uncover the beauty of an ancient glass-making method that transforms crushed glass into art. This technique, known for its precision and vibrant results, has been cherished for centuries. Whether you’re new to the craft or a seasoned artist, this introduction will guide you through its essentials.
What is Pâte de Verre?
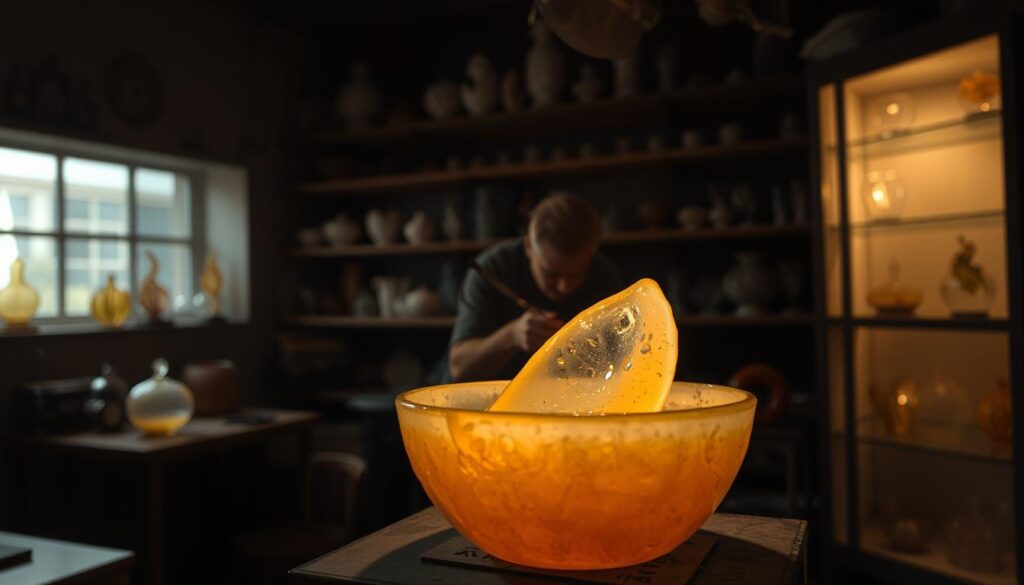
Pâte de verre, or “glass paste,” involves mixing crushed glass with binding agents to create intricate designs. Unlike hot glass blowing, this method allows for detailed and delicate pieces. It’s a unique approach that combines creativity with technical skill.
History and Evolution of the Technique
The origins of this technique date back to 1500 BCE in Mesopotamia. It gained prominence in ancient Egypt and was later revived in 19th-century France. Modern artists, like Shin-ichi Higuchi, have refined it further, achieving eggshell-thin applications.
In the 20th century, advancements in kiln temperature control improved the process. Today, studios like The Crucible preserve these traditional methods through classes and workshops. This ensures the art form continues to thrive.
Understanding the Basics of Glass Casting
Glass casting is a fascinating process that blends creativity with precision. It involves shaping molten or crushed glass into unique forms using molds and heat. This technique allows for intricate designs and vibrant colors, making it a favorite among artists.
What Makes This Technique Unique?
Unlike traditional glass blowing, this method uses a cold-working process. Crushed glass, or frit, is mixed with binding agents and applied to molds. This approach ensures fine details and minimizes bubbles, resulting in delicate and transparent pieces.
The particle size of the glass plays a key role. Smaller frit creates smoother surfaces, while larger pieces add texture. Multi-step firing schedules in the kiln allow for complex color layering, enhancing the final artwork.
Key Differences Between This and Other Techniques
Compared to sand casting or lost wax methods, this process offers greater precision. Plaster-silica molds are often used instead of serpentine sand, ensuring finer details. This makes it ideal for detailed relief work rather than solid sculptural forms.
Another advantage is the ability to control transparency and bubble formation. The cold-working process reduces the risk of imperfections, giving artists more control over the final piece. This technique truly stands out for its versatility and precision.
Essential Tools and Materials for Pâte de Verre
To create stunning glass art, you’ll need the right tools and materials. This section covers everything from kilns to molds, ensuring you’re well-prepared for your creative journey.
Kiln and Kiln Furniture
A kiln is the heart of this process. Look for one with precise temperature control, ramp rates, and annealing capabilities. A minimum size of 12×12 inches is ideal for small to medium projects. Kiln furniture, like shelves and posts, ensures your pieces are evenly heated.
Glass Paste and Color Application
Bullseye Glass offers both billets and frit, each creating unique visual effects. Smaller frit particles result in smoother surfaces, while larger ones add texture. For color application, layer different particle sizes to achieve depth and vibrancy in your designs.
Molds and Investment Materials
Creating detailed pieces requires high-quality molds. Use a plaster-silica mix in a 1:1:1 ratio for durability. For intricate designs, 3D-printed resin forms are an excellent choice. Coldworking tools, like gram scales, ensure precision in your measurements.
If you’re taking classes at The Crucible, their studio provides access to professional-grade equipment. This makes it easier to focus on your creativity without worrying about sourcing materials.
Safety Precautions in Glass Casting
Safety is a top priority when working with glass casting techniques. This process involves high temperatures and delicate materials, making it essential to follow strict guidelines. Whether you’re in a studio or working at home, these precautions will help you stay protected.

Protective Gear and Ventilation
Proper protective gear is a must. Wear Kevlar gloves, face shields, and fire-resistant aprons to shield yourself from heat and splinters. Respirators are mandatory when handling dry materials to avoid inhaling silica dust.
OSHA-approved ventilation systems are crucial in a studio setting. They reduce exposure to harmful fumes and dust. Always ensure your workspace has adequate airflow.
Handling Hot Glass and Kiln Safety
Handling hot glass requires caution. Use welding gloves and tongs to move heated pieces. Always monitor the kiln to prevent overheating or thermal shock incidents.
In case of emergencies, have vinegar cleaning solutions ready to neutralize chemical spills. Follow The Crucible’s safety policies, such as wearing closed-toe shoes and natural fiber clothing.
| Safety Item | Purpose |
|---|---|
| Kevlar Gloves | Protect hands from heat and splinters |
| Face Shield | Shield face from flying debris |
| Respirator | Prevent inhalation of silica dust |
| Fire-Resistant Apron | Protect body from heat and flames |
For minor injuries like glass splinters or thermal burns, clean the area immediately and apply first-aid measures. Keep a well-stocked first-aid kit in your workspace.
Step-by-Step Guide to Creating a Pâte de Verre Piece
Mastering the art of glass casting requires a clear, step-by-step approach. This guide breaks down the process into manageable stages, from designing your piece to the final touches. Whether you’re a beginner or refining your techniques, these steps will help you achieve stunning results.
Step 1: Designing Your Piece
Start by sketching your design or sculpting it in wax. Wax sculpting allows for intricate details and serves as the foundation for your mold. Focus on creating a positive mold that captures every element of your vision. This step sets the tone for the entire process.
Step 2: Preparing the Mold
Once your design is ready, create a plaster-silica mold. Mix the investment material in a 1:1:1 ratio to ensure durability. Pour the mixture carefully to avoid air bubbles, which can affect the final piece. Let the mold set completely before moving to the next step.
Step 3: Applying the Glass Paste
Measure the crushed glass using the water displacement method for accuracy. Apply the glass paste evenly into the mold, layering different particle sizes for texture and depth. This step requires patience and precision to achieve the desired effect.
Step 4: Firing the Kiln
Place the mold in the kiln and follow Bullseye Glass’s recommended firing schedule. Proper temperature control ensures the glass melts evenly and minimizes imperfections. This stage is critical for transforming the paste into a solid, vibrant piece.
Step 5: Cooling and Finishing
Allow the kiln to cool gradually to prevent thermal shock. Once cooled, carefully remove the mold and begin coldworking. Use lap wheels and belt sanders to smooth edges and refine details. This final step brings your creation to life, ready to display or use.
Exploring Pâte de Verre: The Art of Casting Glass with Paste
Elevate your glass casting skills by mastering advanced techniques and avoiding common pitfalls. This section dives into professional methods and practical tips to refine your craft. Whether you’re aiming for intricate designs or vibrant colors, these insights will help you achieve stunning results.
Advanced Techniques and Tips
To create gradient effects, use graduated frit sizes. Start with larger particles at the base and transition to smaller ones for a smooth blend. This method adds depth and dimension to your art.
Refractory mold treatments can enhance surface texture. Apply a thin layer of refractory material to the mold before adding the glass paste. This ensures even distribution and reduces imperfections.
For multi-color registration, layer different color frits carefully. Use a fine brush or tool to place each hue precisely. This technique allows for complex designs and vibrant contrasts.
Common Mistakes to Avoid
Inadequate annealing is a frequent error. Always follow the recommended cooling schedule to prevent cracks or breaks. Rushing this step can ruin an otherwise perfect form.
Mold contamination is another issue. Ensure your molds are clean and free of debris before use. Even small particles can affect the final piece’s quality.
If a piece cracks during coldworking, don’t discard it. Use lap wheels to smooth the edges and salvage the art. With patience, you can often restore its beauty.
- Use graduated frit sizes for gradient effects.
- Apply refractory treatments for better texture control.
- Layer colors precisely for multi-color designs.
- Follow proper annealing schedules to avoid cracks.
- Clean molds thoroughly to prevent contamination.
- Salvage cracked pieces with careful coldworking.
Examples of Pâte de Verre Artwork
Immerse yourself in the world of intricate glass sculptures created through innovative techniques. Studying existing works can inspire your own creations and deepen your understanding of the craft. From master artists to student projects, each piece offers valuable lessons in design and execution.
Inspirational Pieces by Master Artists
Shin-ichi Higuchi’s translucent vessels are a prime example of mastery in this art. His works, often featured in The Studio’s archives, showcase delicate layers and precise control over the form. These pieces highlight the potential of combining traditional methods with modern creativity.
Another source of inspiration is the student projects from The Crucible’s Kiln Casting II classes. Relief tiles and reverse imagery sculptures demonstrate the versatility of this medium. These works often push boundaries, blending technical skill with artistic vision.
How to Analyze and Learn from Existing Works
To improve your craft, study the techniques used in successful pieces. For example, analyze how artists achieve internal imagery through the reverse relief method. This approach involves carving the design into the mold, allowing the glass to capture intricate details.
Market trends in contemporary glass exhibitions can also provide insights. Look for recurring themes, color palettes, and innovative uses of the medium. This knowledge can help you create pieces that resonate with audiences.
- Examine Shin-ichi Higuchi’s vessels for layering techniques.
- Critique student works to understand creative problem-solving.
- Practice reverse relief for detailed internal imagery.
- Stay updated on trends in glass art exhibitions.
- Develop a framework for technical analysis of museum pieces.
By studying these examples, you can refine your skills and create glass sculptures that stand out in any studio or gallery.
Learning Pâte de Verre at The Crucible
Dive into hands-on learning with expert-led workshops at The Crucible. Whether you’re a beginner or an experienced artist, their classes offer a structured way to master the craft of glass casting. From short introductory sessions to in-depth courses, there’s something for everyone.

Available Classes and Workshops
The Crucible offers a variety of classes tailored to different skill levels. The 3-Hour Taster is perfect for newcomers. In this session, you’ll learn color application techniques while creating shallow bowls. It’s a great way to get a feel for the process without a long-term commitment.
For those ready to dive deeper, the Kiln Casting I class spans six sessions. This course focuses on the lost wax process, teaching you how to create detailed molds and cast intricate designs. Advanced students can continue with Kiln Casting II, which explores more complex techniques like coldworking and multi-layered designs.
What to Expect in a Class
When you enroll in a class, you’ll have access to The Crucible’s fully equipped studio. All essential materials, like molds and glass frit, are provided. However, students are encouraged to bring their own tools for a personalized experience.
The studio also has policies to ensure a safe and productive environment. Students aged 14 and above can join with a guardian’s consent. Alumni often share their success stories, with many showcasing their work in exhibitions hosted by The Crucible.
- Learn color application in the 3-Hour Taster.
- Master the lost wax process in Kiln Casting I.
- Explore advanced techniques in Kiln Casting II.
- Access professional-grade tools and materials.
- Join a community of passionate artists.
Frequently Asked Questions About Pâte de Verre
Have you ever wondered if you can create intricate glass art at home? This section answers common questions about the process, from setup to completion. Whether you’re considering a home studio or attending a class, we’ve got you covered.
Can You Cast Glass at Home?
Yes, you can cast glass at home, but it requires careful planning and investment. A basic setup includes a kiln, molds, and safety equipment. However, professional studios like The Crucible offer advantages like advanced tools and expert guidance.
- Home Setup: Expect a minimum investment of $5,000 for equipment and materials.
- Zoning Requirements: Check local regulations for kiln installation and ventilation needs.
- Safety Measures: Ensure proper ventilation, protective gear, and fire safety protocols.
How Long Does It Take to Cast Glass?
The time required depends on the size and complexity of your piece. Annealing alone takes 24 hours per inch of thickness. For example, a 3-inch sculpture may require 72+ hours of firing and cooling.
- Firing Schedule: Follow Bullseye Glass’s guidelines for precise temperature control.
- Class Duration: The Crucible’s Kiln Casting I class spans six sessions, offering hands-on experience.
- COVID Policies: In-person classes follow strict safety protocols, including mask requirements and limited class sizes.
If you’re attending a class, The Crucible ensures a safe and supportive environment. Students retain ownership of their creations, with no liability concerns for the studio. Whether at home or in a class, patience and attention to detail are key to mastering this craft.
Conclusion
This ancient method of creating intricate glass pieces continues to inspire artists worldwide. Its unique techniques allow for detailed and vibrant designs, making it a standout in the world of art. Whether you’re a beginner or an experienced creator, mastering this process opens endless creative possibilities.
If you’re eager to learn, consider enrolling in a class at The Crucible. Their workshops offer hands-on experience and expert guidance, helping you refine your skills. For returning students, advanced methods like multi-layered designs and coldworking await.
For those experimenting at home, remember to prioritize safety. Always use protective gear and follow proper protocols when working with glass. Resources like Bullseye Glass’s firing schedules can guide your independent study.
Dive into this timeless craft and let your creativity shine. The journey of mastering this art is as rewarding as the final piece itself.