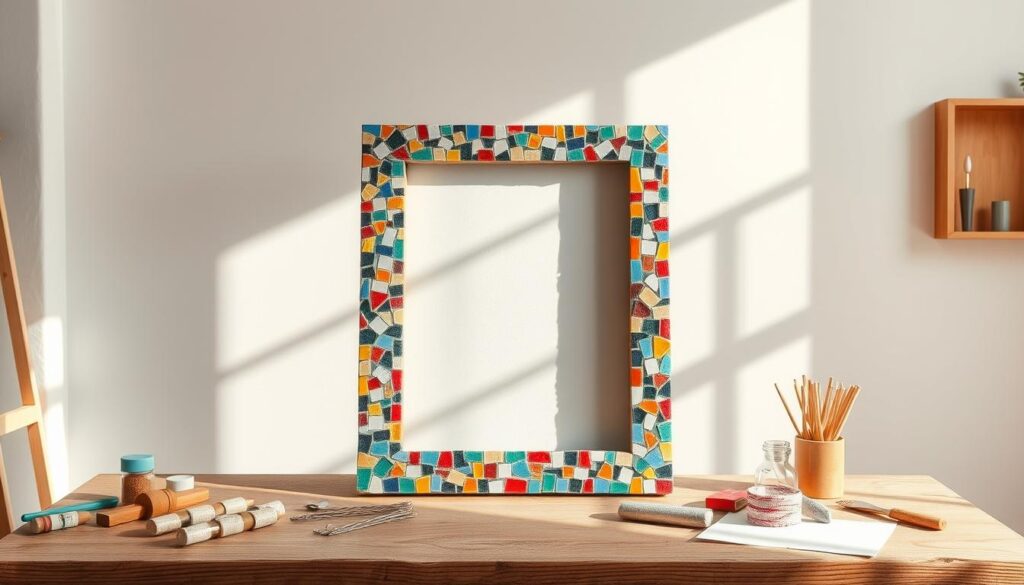
Transforming broken ceramics or glass into a stunning mosaic frame is easier than you think. This creative project lets you repurpose sentimental pieces into something beautiful. Whether it’s a chipped teacup or colorful tiles, every fragment tells a story.
Not only does this craft add a personal touch to your home decor, but it also serves as a relaxing creative outlet. Imagine turning forgotten treasures into a one-of-a-kind display piece. The process involves simple steps like arranging fragments, applying adhesive, and finishing with grout.
Safety comes first—always wear gloves and goggles when handling materials. With a little patience, you’ll create a frame that’s both functional and meaningful. Ready to dive in? Let’s explore the basics.
Introduction to Mosaic Art
From ancient Roman villas to modern homes, mosaic art brings beauty to everyday spaces. This craft dates back thousands of years, where artisans arranged tiny tiles into intricate floors and walls. Today, it’s a creative way to turn broken ceramics or glass into eye-catching designs.
What Is Mosaic Art?
Traditionally, mosaic art involved assembling small pieces of stone, glass, or tile to form patterns. Romans used it for lavish floors, while Moroccan designs featured vibrant geometric shapes. Modern versions include wall hangings, tabletops, and even functional items like coasters.
Why Choose a Picture Frame for Your First Project?
Frames are perfect for beginners due to their small, flat surface. Unlike larger projects, they require fewer materials and dry faster. Plus, you’ll have a usable piece of decor in no time. It’s also a relaxing activity—studies show mosaics reduce stress by focusing the mind on patterns.
Benefits of Creating a Mosaic Picture Frame
Crafting a unique piece of decor has never been more rewarding. A mosaic frame combines artistry with practicality, offering both visual appeal and sentimental value. Whether you’re a first-timer or a seasoned crafter, the perks are undeniable.
Personalized Home Decor
Transform plain frames into cherished keepsakes. Use broken ceramics, glass, or tiles to design a piece that matches your home’s aesthetic. Custom colors let you adapt to seasons—think warm tones for fall or pastels for a nursery.
It’s also a meaningful way to preserve memories. One artist turned shattered heirloom pottery into a stunning mosaic, blending grief with creativity. Your frame becomes more than decor—it’s a legacy.
Therapeutic and Creative Outlet
The repetitive placement of tiles creates a meditative rhythm. Studies show this process reduces stress by focusing the mind on patterns. It’s a therapeutic escape from screens and daily chaos.
As an ideal creative outlet, mosaics encourage experimentation. Unlike store-bought frames, yours will be one-of-a-kind. Plus, it’s budget-friendly—most materials are reusable or affordable.
- Unique: No two frames look alike.
- Relaxing: The process calms the mind.
- Eco-friendly: Upcycle broken items instead of trashing them.
Materials You’ll Need
Gathering the right supplies is the first step toward crafting a durable mosaic. Whether repurposing broken ceramics or using new tiles, having the correct materials ensures a smooth process. Below, we’ve split the list into essentials and fun extras.
Essential Tools and Supplies
Start with these basics to build a sturdy foundation:
- Safety gear: Gloves and goggles protect against sharp edges.
- Cutting tools: A hammer or tile nippers shape pieces precisely.
- Adhesive: Weldbond or all-in-one grout/adhesive works best.
- Frame base: MDF or wood—choose based on durability needs.
- Grout: Black or colored options enhance design contrast.
Pro tip: Ziploc bags help organize fragments by color or size.
Optional Embellishments
Elevate your design with these creative touches:
- Beads or buttons: Add texture from craft stores.
- Sea glass: Offers a beachy, translucent effect.
- Broken jewelry: Upcycle sentimental pieces into the pattern.
Mosaic kits are great for beginners—they include pre-cut tiles and instructions.
Choosing the Right Frame Base
The foundation of your mosaic project starts with selecting the right base. A sturdy foundation ensures your design stays intact and complements your tiles or glass pieces. Consider material, size, and shape to match your skill level and vision.
Wood vs. MDF Frames
MDF (Medium-Density Fiberboard) is a popular choice for beginners. It’s affordable, smooth, and easy to find at craft stores. The uniform surface helps tiles adhere evenly.
Wood offers durability and a rustic charm. Natural textures add character but may require sanding for a flat surface. Ideal for heavier materials like ceramic shards.
Size and Shape Considerations
Start small with a 5×7″ or 8×10″ frame—it’s manageable for first-timers. Odd shapes like ovals need strategic tile placement to avoid gaps.
- Weight limits: Thin frames buckle under heavy glass pieces.
- Grout coverage: Larger frames need extra adhesive to prevent cracks.
Pro tip: Sketch your design on paper first to visualize spacing.
Preparing Your Materials
Before diving into the creative process, proper preparation ensures smooth crafting. Organizing your workspace and handling materials safely prevents mishaps. Follow these steps to set up efficiently.
Selecting and Smashing Tiles or Glass
Break materials carefully to preserve usable pieces. Place tiles or glass inside double Ziploc bags before smashing. This controls shards and saves patterns.
Sort fragments by color or size in labeled containers. Curate special designs—like text from ceramics—for focal points. Pro tip: Use a cloth over bags to minimize dust.
Safety Gear and Workspace Setup
Always wear safety gear: gloves, goggles, and close-toed shoes. Cover your table with newspaper for easy cleanup. Ensure ventilation if working indoors.
- Tools: Keep a hammer, nippers, and a damp sponge nearby.
- First aid: Bandages should be accessible for minor cuts.
- Organization: Group fragments by type to streamline designing.
Designing Your Mosaic
Planning your design is where creativity meets strategy in mosaic crafting. A thoughtful layout ensures your stunning mosaic reflects your vision while avoiding last-minute adjustments. Photographing arrangements before gluing—as recommended by experts—helps preserve your favorite patterns.
Sketching Your Layout
Start by tracing your frame’s outline on paper. Experiment with two approaches:
- Geometric patterns: Use rulers for clean lines and symmetry.
- Freeform abstract: Organic shapes work well with irregular fragments.
For beginners, mosaic kits provide pre-designed templates. Place larger pieces first as focal points—either centered or offset for dynamic balance.
Color and Pattern Tips
Combine shades intentionally using basic color theory:
- Pair complementary colors (blue/orange) for bold contrast.
- Analogous hues (green/yellow) create harmony.
Test grout shades on scrap wood with tile samples. Dark grout defines pattern tips, while light tones unify busy designs. Pro tip: Lay fragments under bright light to preview their interplay.
Step-by-Step Guide to Make Your Own Mosaic Picture Frame
Now it’s time to bring your vision to life with careful adhesive application. This phase ensures your pieces stay securely attached to the frame. Work methodically to avoid drying issues, especially in warm weather.
Applying Adhesive to the Frame
Use a plastic knife to spread thin, even layers of adhesive. Divide the frame into 3″x3″ sections to prevent premature drying. Press firmly but avoid excess—too much adhesive oozes into grout lines.
Placing Your Tiles or Broken Pieces
Start from the edges and move inward for balanced spacing. Twist each piece slightly as you press it down—this improves adhesion. Leave 1/8″ gaps between pieces for grout, as seen in sea glass mosaic techniques.
Let the adhesive cure fully before grouting. Your patience will pay off with a durable project that showcases your creativity.
Working with Adhesive
Choosing the right adhesive is crucial for a long-lasting mosaic. The glue holds your design together and affects durability. Different types suit various materials and environments.

Types of Adhesives for Mosaics
Pick an adhesive based on your project’s needs. Here’s a quick comparison:
| Type | Best For | Drying Time | Notes |
|---|---|---|---|
| PVA (Weldbond) | Indoor, lightweight tiles | 24 hours | Non-toxic, won’t yellow |
| Epoxy | Outdoor, heavy materials | 12–24 hours | Waterproof, industrial strength |
| Thinset Mortar | Wet areas (e.g., bathrooms) | 72 hours | Needs ventilation |
Pro tip: Weldbond is a beginner-friendly choice recommended by mosaic experts for its ease of use.
Drying and Curing Time
Patience pays off. Rushing this step risks loose tiles or uneven grout. Follow these guidelines:
- Humidity: High moisture slows drying. Use a dehumidifier if needed.
- Temperature: Ideal range is 60–75°F. Cold extends time.
- Weight: Heavy pieces need full 24 hours to cure.
Always let dry undisturbed. Test a small area before grouting to ensure firm adhesion.
Grouting Your Mosaic Frame
Grout gives your project a polished, professional look while securing the tiles in place. This step transforms fragmented pieces into a cohesive design. Follow these techniques to achieve smooth, even results.
How to Mix Grout
Start with the right consistency—aim for oatmeal-like thickness. Follow the manufacturer’s instructions for water-to-powder ratios. Too much water weakens the grout, while too little makes it crumbly.
Use a plastic container for mixing. Stir slowly to avoid air bubbles. Let the mixture sit for 5–10 minutes before applying. This helps it bond better.
Applying and Smoothing Grout
Work in small sections using a rubber float or gloved fingers. Push the grout diagonally into gaps to prevent air pockets. Remove excess grout with the float at a 45-degree angle.
After 20 minutes, wipe away haze with a damp sponge. Rinse frequently to avoid smearing. For pinholes, press fresh grout into gaps before it dries completely.
- Mix ratios: Precision ensures durability.
- Tools: Rubber floats offer better control than fingers.
- Timing: Wait 20 minutes before haze removal.
Cleaning and Polishing Your Frame
A flawless finish elevates your mosaic from craft to masterpiece. Proper techniques remove haze and highlight your design’s details. Take time here—the final steps define your frame’s longevity and shine.
Removing Excess Grout
Start with a damp sponge and light pressure. Wipe diagonally across tiles to avoid pulling grout from gaps. Rinse frequently to prevent smearing.
For stubborn residue, use a toothpick in crevices. Avoid paper towels—they leave fibers that dull the surface. Let the frame dry for 20 minutes before a second pass.
Buffing for a Professional Finish
Once fully dry, polish tiles with a microfiber cloth or cheesecloth. Circular motions enhance shine without scratching. For glass pieces, use sequential buffing—coarse to fine cloths.
- First pass: Remove remaining haze with a dry cloth.
- Detail work: Focus on edges where grout collects.
- Final touch: Apply glass cleaner (for non-porous tiles only).
Pro tip: Inspect under bright light to spot missed spots. Your frame should gleam like a gallery piece.
Drying and Sealing
Proper drying and sealing ensure your mosaic lasts for years. This phase locks in your hard work, preventing cracks or discoloration. Follow these steps to protect your project from humidity, spills, and daily wear.
Waiting Period Before Use
Allow at least 24 hours for the grout to fully cure. Rushing this time risks loose tiles or uneven surfaces. Factors like climate affect drying:
- Humid areas: Extend drying to 48 hours.
- Arid climates: Cover with plastic to slow drying and prevent cracks.
Pro tip: Test adhesion by gently tapping a tile. If it sounds hollow, wait longer.
Applying Grout Sealer (Optional)
A grout sealer adds extra protection, especially for frames in kitchens or bathrooms. Choose between two types:
| Type | Best For | Application |
|---|---|---|
| Penetrating | Porous tiles | Absorbs into grout; lasts 1–2 years |
| Topical | Non-porous surfaces | Forms a glossy layer; reapply annually |
Use a small brush for precision, sealing grout lines only. For edges, clear nail polish prevents chipping. Inspired by serving tray techniques, this step ensures your frame stays as vibrant as day one.
Troubleshooting Common Issues
Even experienced crafters encounter challenges when working with mosaics. Small flaws like loose tiles or uneven grout can seem daunting, but fixes are straightforward. With patience and the right techniques, your mosaic project will look polished.
Loose Tiles or Uneven Grout
If pieces detach, scrape off old adhesive first. Apply fresh glue and press firmly. For uneven grout, dig out problem areas with a toothpick and refill.
Pro tip: Check tiles before grouting—this saves time and avoids rework. Color-match new grout by mixing small batches until shades align.
Fixing Air Bubbles
Air pockets weaken the structure. Prevent them by mixing grout slowly to avoid trapping air. Use a syringe for pinpoint application in gaps.
| Issue | Solution | Tool |
|---|---|---|
| Loose tiles | Reattach with epoxy | Plastic knife |
| Grout cracks | Regrout & seal | Rubber float |
| Air bubbles | Inject fresh grout | Syringe |
For intricate repairs, sea glass techniques offer inspiration. Remember, imperfections add character—your frame is uniquely yours.
Alternative Methods for Beginners
Jumpstarting your mosaic journey doesn’t require advanced skills—simplified methods exist for newcomers. Whether you prefer guided kits or skip grout entirely, these approaches help you get started with confidence.
Using Mosaic Kits
Mosaic kits streamline the process with pre-cut tiles and color-coordinated designs. Brands like Spring Time offer themed sets, while coaster kits simplify small projects. Benefits include:
- Time-saving: No tile cutting or design planning.
- Beginner-friendly: Instructions tailor to first-timers.
- Cost-effective: Often cheaper than sourcing materials separately.
Local craft stores like Michaels stock diverse options. Compare prices—kits under $20 suit tight budgets.
Painting Instead of Grouting
For a minimalist way to finish, acrylic or spray paint replaces traditional grout. Black acrylic creates bold contrast, as seen in third-party tutorials. Tips:
- Use matte paint for textured frames.
- Seal with varnish to prevent chipping.
Note: Paint works best on flat surfaces—avoid 3D designs.
Creative Variations to Try
Expand your creativity with unexpected embellishments and themed patterns. These twists transform basic frames into conversation-starting decor. Whether you prefer subtle textures or bold statements, there’s a style for every skill level.
Incorporating Beads or Buttons
Add depth to your design with mixed-media accents. Buttons create playful textures, while beads introduce shimmer. Use a glue gun for secure adhesion—especially on curved surfaces.
*Pro tip*: Match bead colors to tiles for cohesion. Upcycle broken jewelry for sentimental touches.
Themed Designs (Holiday, Nature, etc.)
Themes make your stunning mosaic feel intentional. Try these ideas for inspiration:
- Seasonal: Red/green shards for Christmas; orange leaves for fall.
- Nature: Blue sea glass waves or terra cotta stone paths.
- Kids’ projects: Outline cartoon characters with bold fragments.
Sketch themes on paper first to visualize spacing. Your frame becomes a canvas for storytelling.
Displaying and Caring for Your Frame
Your finished mosaic frame deserves the perfect spot to shine. Whether it’s a gallery wall or a bedside table, proper placement and maintenance preserve its beauty. Follow these steps to showcase and protect your artwork.
Choosing the Right Hanging Method
Pick hardware based on weight and home decor style. Sawtooth hangers suit lightweight frames, while D-rings offer stability for heavier pieces. For uneven walls, use a level to align the frame perfectly.
Pro tip: Adhesive strips work for renters—they leave no marks and hold up to 5 lbs.
Daily and Long-Term Maintenance
Dust gently with a soft brush or microfiber cloth. Avoid harsh cleaners that damage grout. For deep crevices, compressed air blasts away debris without scratching.
- Humidity control: Keep frames away from bathrooms or kitchens to prevent warping.
- UV protection: Hang sunlit frames behind UV-filtering glass or rotate them seasonally.
- Resealing: Reapply grout sealer annually for high-traffic areas.
With minimal time and effort, your make mosaic masterpiece stays vibrant for decades. Treat it like the heirloom it’s meant to be.
Conclusion
Creating a mosaic art piece is both rewarding and accessible for beginners. Remember the essentials: safety gear, thoughtful design, and patience with grout. Each project is a chance to experiment—try beads, sea glass, or even broken jewelry for unique flair.
Share your finished work online to inspire others. Ready to get started? Smaller items like coasters or garden stones make great next steps. Dive in and let creativity guide you.
Every fragment tells a story—what will yours say?