Mandala mosaic creations bring harmony and mindfulness into your home. These intricate patterns, rooted in ancient traditions, transform spaces with their meditative beauty. Whether you’re a beginner or a seasoned crafter, this guide makes the process simple and rewarding.
No tile cutting is needed—just a mosaic kit and a stone base to get started. Projects like the Mandala Stone Mosaic prove how accessible this art can be. The rhythmic placement of pieces becomes a calming ritual, blending creativity with relaxation.
Personalize your space with symbolic designs that reflect balance. Each piece you place adds character and tranquility to your surroundings. Let’s explore how these timeless patterns can elevate your decor effortlessly.
Introduction to Mandala Mosaics
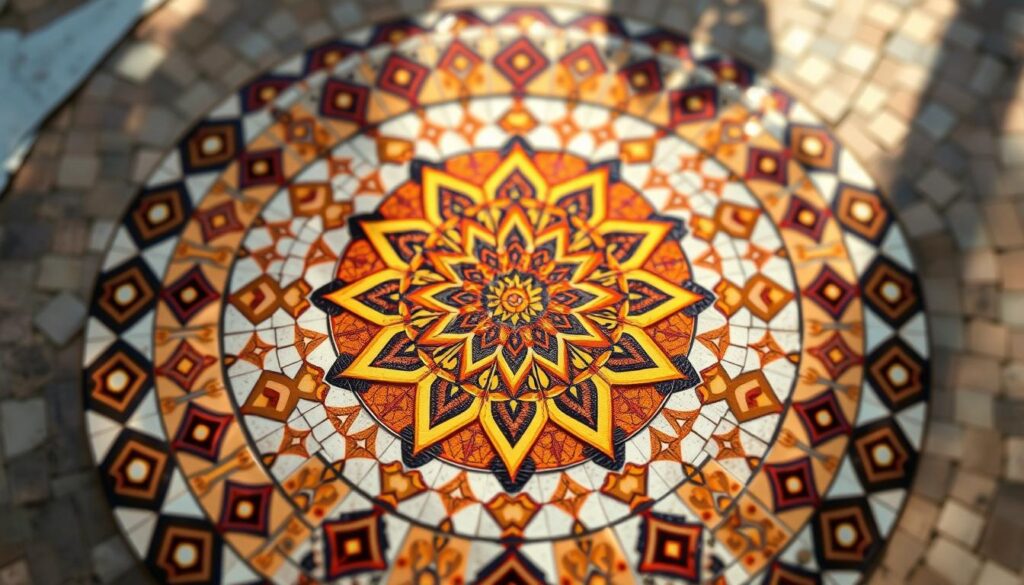
Sacred circles with intricate geometry have guided artists for centuries. These mandala patterns, rooted in Hindu and Buddhist traditions, symbolize unity and balance. Today, they inspire modern mosaic art, blending spirituality with creative expression.
What Is a Mandala?
A mandala is a circular design with radial symmetry, often featuring layers of geometric shapes. Historically, monks created them as meditation tools. Now, they’re celebrated for their therapeutic benefits, helping to enhance focus and mindfulness.
Unlike freeform patterns, mandalas offer built-in structure. This makes them ideal for beginners. Every tile placement follows a natural rhythm, turning the process into a calming ritual.
Why Choose a Mandala for Your Mosaic?
Mandala mosaic art stands out for its visual harmony. For example, the Panel Mandala uses 3,250 marble pieces to create a breathtaking centerpiece. Compared to abstract wall art, these designs provide a clear focal point.
They also encourage creativity within boundaries. You can experiment with colors and textures while maintaining balance. Whether for decor or personal growth, mandala mosaics transform spaces and minds alike.
Gathering Your Materials
Quality materials ensure your mosaic stands the test of time—start with the right tools. Whether using glass or stone tiles, having a complete toolkit prevents mid-project hiccups. This section covers essentials and where to find them.
Essential Tools and Supplies
Your checklist should include:
- Adhesive: Cement-based options (like those in Source 1’s kit) offer durability for indoor pieces.
- Grout: Choose a color that complements your design.
- Safety gear: Gloves and goggles protect against sharp edges.
- Base material: Avoid outdoor-grade stone unless sealed properly.
| Glass Tiles | Stone Tiles |
|---|---|
| Micro tiles (Source 1) | 8mm marble (Source 2) |
| Lightweight, vibrant colors | Natural texture, earthy tones |
| Ideal for detailed patterns | Mesh-backed for easy placement |
Where to Buy Mosaic Kits
Pre-cut mosaic kits simplify the process. Look for retailers offering free shipping on bulk orders. Trusted suppliers include:
- The Mosaic Store (pre-cut glass tiles)
- Delphi Glass (marble tiles with mesh backing)
For beginners, learn mosaic basics with simpler projects before tackling mandalas.
Tip: Label all items to keep your workspace organized. Store adhesives in airtight containers to extend usability.
Choosing the Right Base for Your Mosaic
Your mosaic’s foundation determines its durability and visual impact. Whether you prefer a stone mosaic or lightweight tiles, the base material affects weight, stability, and where you can display your art. Consider these factors to match your project’s needs.
Stone vs. Tile Bases
Stone mosaic bases, like marble, offer a premium feel but weigh more—a 20″x20″ piece can reach 10lbs. They’re ideal for showers or pools due to moisture resistance. Ceramic tiles are lighter and easier to mount on wall displays.
Wood bases suit tabletops but require sealing to prevent warping. For indoor outdoor flexibility, choose materials rated for temperature changes. Always check load-bearing limits for large installations.
Indoor vs. Outdoor Considerations
Outdoor bases need weatherproof adhesives and UV-resistant sealants. A 50cm x 50cm size works well for patios. Indoors, focus on aesthetics—glass tiles shine on walls, while stone mosaic pieces anchor tabletops.
Non-traditional bases like planters or vases add whimsy. Just ensure surfaces are clean and primed for adhesion. Test small sections first to avoid surprises.
Designing Your Mandala Pattern
Radial symmetry transforms simple shapes into art. Start with a center dot and radiating lines, as suggested in Source 1. This framework ensures your pattern stays balanced and visually striking.
Sketching a Precise Template
Use a compass and ruler to create guidelines. Divide your circle into equal segments—like slicing a pie. This method scales designs accurately, whether for a 6-inch stone or a 24-inch wall piece.
Grid paper helps maintain symmetry. Label each section to avoid confusion during tile placement. For intricate details, enlarge your template by 150% for easier handling.
Color and Texture Harmony
Analogous color schemes (like blue-green) create calmness. Complementary pairs (red-green) add energy. Consider cultural meanings—red symbolizes passion, while blue evokes tranquility.
| Polished Glass | Rough Stone |
|---|---|
| Reflective, vibrant | Natural, earthy |
| Ideal for light-filled spaces | Adds tactile depth |
| Pairs with metallic accents | Enhances rustic themes |
Place bold textures at the focal point—usually the center. Surround them with smoother tiles for contrast. Test combinations under different lighting before finalizing.
Preparing Your Workspace
A well-prepared workspace makes your project smoother and safer. Dedicate a flat, clutter-free area with good lighting. Keep all items within reach to maintain focus as you work.
Organizing Materials
Sort items by type and color before starting. Use small containers for glass or stone tiles to avoid mix-ups. Label adhesives and grouts clearly—this saves time during the creative process.
Set up a cutting mat if trimming tiles. Place a damp cloth nearby for quick cleanups. A rolling cart keeps tools mobile if space is limited.
Safety Tips
Wear cut-resistant gloves when handling sharp edges, especially during grouting. Source 1 highlights this as a non-negotiable step. Add an N95 mask if sanding or mixing dust-prone materials.
Ensure ventilation for adhesives. Open windows or use a fan to circulate air. Store a first-aid kit nearby for minor cuts. Bright task lighting reduces eye strain during detailed work.
Pro tip: Clean as you go to prevent slips or misplaced tiles. A tidy space boosts both safety and creativity.
How to Design a Mandala-Inspired Mosaic for Indoor Decor
Precision is key when crafting mandala mosaic creations. The balance of your pattern depends on accurate center-point placement and radial divisions. Follow these techniques to achieve professional results every time.
Finding the Center Point
Two reliable methods exist for locating your center. Laser levels project perfect crosshairs for foolproof alignment. Traditionalists can use a compass and ruler, marking intersecting diagonals from the corners.
For circular bases, Source 1’s dot technique works best. Place a small adhesive dot at the exact middle. This becomes your reference for all subsequent tile placement.
Creating Radial Symmetry
Divide your circle into equal sections like pie slices. Common divisions include:
- 8 sections – Simple yet effective
- 12 sections – Greater detail potential
- 16 sections – Professional complexity
| Division Method | Best For | Tools Needed |
|---|---|---|
| 8-Section | Beginners | Protractor, ruler |
| 12-Section | Intermediate | 30-60-90 triangle |
| 16-Section | Advanced | Precision compass |
Check symmetry by holding a mirror along division lines. Both halves should match perfectly. For complex designs like Source 2’s 3,250-piece masterpiece, work outward from the center in stages.
Fix off-center patterns by gently lifting misplaced tiles before adhesive sets. Reposition using your center dot as the anchor point. Patience here ensures stunning visual harmony.
Cutting and Arranging Tiles
The right cutting technique brings your vision to life. Whether using glass or stone, each material requires specific tools and methods. Proper handling ensures clean edges and reduces waste.
Glass vs. Stone: Cutting Methods
Glass tiles need wheeled nippers for controlled breaks. Always score the surface first to prevent shattering. Wear gloves to protect against sharp edges.
For stone pieces, a wet saw delivers precision. Marble tiles (like Source 2’s hand-cut versions) require steady pressure. Keep a spray bottle handy to reduce dust.
| Material | Tool | Safety Tip |
|---|---|---|
| Glass | Wheeled nippers | Score before snapping |
| Stone | Wet saw | Use eye protection |
Dry-Layout Strategies
Arrange tiles without adhesive first. This reveals color imbalances or gaps. For complex patterns, work outward from the center in sections.
Use spacers or a credit card to maintain even gaps. Rotate sharp edges inward for safety. Label sections with painter’s tape to stay organized.
- Reduce waste: Plan cuts to maximize each tile.
- Gradient sequencing: Group shades from light to dark.
- Check symmetry: Use a mirror to verify balance.
Adhering Tiles to the Base
The right adhesive makes or breaks your mosaic’s longevity. Choosing the best product depends on your base material, tile type, and project location. Proper application ensures your artwork stays intact for years.

Comparing Adhesive Types
Three main options work for most mosaic kits:
| Type | Best For | Drying Time | Water Resistance |
|---|---|---|---|
| Cement-based | Stone tiles, outdoor | 24 hours (Source 1) | Excellent |
| Acrylic | Glass tiles, indoor | 12 hours | Good |
| Epoxy | Mixed media, high-traffic | 8 hours | Superior |
Cement adhesives need longer curing but offer maximum bond strength. Acrylics are easier to clean up with water. Epoxy works best for vertical surfaces.
Application Techniques
Follow these steps for flawless adhesion:
- Calculate coverage: 1 lb adhesive covers ~10 sq ft for 8mm tiles
- Use a notch trowel (1/4″ notches for standard items)
- Work in small sections (2×2 ft) to manage “open time”
- Apply adhesive with a pallet knife for precision edges
Press each tile firmly with a twisting motion. This prevents air bubbles and ensures full contact. Check alignment before the adhesive skins over (usually 15-30 minutes).
Climate Considerations
Environmental factors affect your product performance:
- High humidity slows drying—allow 20% extra time
- Below 50°F? Warm adhesives to 70°F before use
- Direct sunlight causes premature skinning
Keep all items at room temperature for 24 hours before starting. Store opened adhesives in airtight containers to prevent thickening.
Drying and Setting Your Mosaic
Proper drying ensures your artwork stays intact for years. Rushing this stage risks loose tiles or uneven results. Follow adhesive guidelines and environmental tips for flawless curing.
Timeline Based on Adhesive Type
Source 1 recommends 24-hour drying time for cement-based adhesives. Other types vary:
| Adhesive | Pre-Grout Wait | Climate Impact |
|---|---|---|
| Cement | 24 hrs | +50% in humidity |
| Acrylic | 12 hrs | Avoid below 50°F |
| Epoxy | 8 hrs | Sunlight speeds curing |
Accelerate drying with fans in humid areas. Cold climates? Warm the room to 70°F for even setting.
Inspecting for Loose Tiles
After curing, gently tap tiles with a wooden stick. Hollow sounds indicate poor adhesion. Fix loose items immediately:
- Lift the tile carefully with a putty knife.
- Scrape off old adhesive and reapply.
- Use clamps for stone mosaic bases with heavy items.
Red flags: Cracks, shifting tiles, or adhesive seepage. Address these before grouting to prevent long-term damage.
Grouting Your Mandala Mosaic
Grout transforms individual tiles into a unified masterpiece. This step locks your mosaic in place while adding depth to the color scheme. Follow these techniques for flawless results.
Mixing Grout for the Best Consistency
Source 1 recommends a porridge-like texture. Achieve this with precise water-to-powder ratios:
- Sanded grout: 3 parts powder to 1 part water (ideal for gaps >1/8″).
- Un-sanded: 4:1 ratio for tighter spaces.
Mix using a swirl motion to avoid air bubbles. Let it slake for 10 minutes, then remix. Tint grout with pigments for contrast—dark shades make mandala patterns pop.
| Type | Best For | Working Time |
|---|---|---|
| Sanded | Stone tiles, outdoor | 45 minutes |
| Un-sanded | Glass tiles, intricate designs | 30 minutes |
Applying and Cleaning Grout
Use a rubber float at a 45° angle to force grout into gaps. Work in small sections to prevent drying. For tight corners, a squeeze bottle offers precision.
Clean haze with Source 1’s sponge protocol:
- First pass: Damp sponge, circular wipes.
- Second pass: Rinse sponge frequently.
- Final buff: Microfiber cloth after 24 hours.
Tip: Seal your mosaic with a penetrating sealer to protect the grout from stains. Reapply every 2 years for indoor pieces.
Finishing Touches
The final steps elevate your mosaic from craft to gallery-quality art. Proper polishing and sealing protect your work while enhancing its visual appeal. These techniques ensure your piece remains vibrant for years, whether displayed in your home or gifted.
Buffing and Polishing
A rotary tool with a felt wheel creates a mirror-like finish. Start with 800-grit pads for glass tiles, moving to 3,000-grit for stone. Always keep the tool moving to avoid heat buildup.
For luster enhancement:
- Colored glass: Use UV-resistant wax to prevent fading.
- Marble tiles: Apply pH-neutral polish (Source 2’s kit includes this).
- Food-safe surfaces: Opt for beeswax-based products.
Sealing for Longevity
Choose sealants based on your mosaic art’s location:
| Type | Best For | Recoat Schedule |
|---|---|---|
| Penetrating | Stone, outdoor | Every 3 years |
| Topical | Glass, tabletops | Annually |
Source 2’s lifetime warranty covers materials when using their sealant. Their authenticity certificate verifies premium ingredients. For high-traffic areas, reapply sealant every 6 months.
Troubleshooting Common Issues
Even experienced crafters encounter challenges when creating intricate designs. Small missteps—like uneven tiles or grout haze—can disrupt your results. This guide helps you correct these issues efficiently, preserving your artwork’s beauty.
Fixing Misaligned Tiles
Act quickly if a tile sits crooked. Most adhesives allow adjustments within 15–30 minutes. Use a toothpick to nudge small pieces; for larger ones, a putty knife lifts them without damage.
For fully cured adhesive (24+ hours), try these methods:
- Dremel extraction: Grout around the tile first, then use a diamond bit to remove adhesive.
- Heat softening: A hair dryer on low heat loosens acrylic-based products.
| Adhesive Type | Reposition Window | Tool |
|---|---|---|
| Cement-based | 20 mins | Palette knife |
| Epoxy | 8 mins | Plastic scraper |
Dealing with Grout Haze
Haze forms when excess grout dries on tile surfaces. Source 1 recommends buffing with a dry microfiber cloth first. For stubborn residue:
- Vinegar solution (1:3 with water) dissolves mineral deposits.
- Commercial haze removers work faster but test on a hidden spot.
- Rinse thoroughly to avoid streaks.
Note: Source 2 offers a 30-day return policy for defective products. For color bleed, seal porous tiles before grouting. Epoxy repairs cracks better than cementitious materials.
Displaying Your Mandala Mosaic
Your finished artwork deserves the perfect spot to shine. Whether mounted on a wall or placed as a tabletop centerpiece, strategic positioning enhances its beauty. Consider lighting, room flow, and weight distribution for a display that complements your home.
Wall Mounting vs. Tabletop Displays
For wall installations, French cleats offer superior support for heavier pieces. These interlocking brackets distribute weight evenly. Adhesive mounts work for lighter designs under 5 lbs—check the manufacturer’s weight limits.
Tabletop displays provide flexibility. Rotate your piece seasonally or use it as a functional surface. Source 2’s panels work well for both indoor outdoor settings when sealed properly.
| Mount Type | Max Weight | Best For |
|---|---|---|
| French cleat | 50 lbs | Stone mosaics |
| Adhesive strips | 5 lbs | Glass tile art |
| Floating shelf | 20 lbs | Medium pieces |
Lighting and Placement Tips
LED spotlights at 45-degree angles highlight textures. For home displays, position the center at eye level (57-60 inches). This creates natural focal points in any room.
Follow these principles for impactful placement:
- Feng shui: East-facing walls promote creativity
- Vibration control: Use rubber bumpers behind wall pieces
- Custom sizing: Source 2 offers panels from 12″ to 36″ diameters
Group smaller mosaics in odd numbers for visual interest. Larger pieces stand alone as statement art. Always measure your space before finalizing the display location.
Inspiration for Future Projects
Creative possibilities multiply when experimenting with mixed media. Your first mandala mosaic opens doors to advanced techniques that blend tradition with innovation. Discover how small changes in materials and approach yield stunning new results.
Elevating Your Technique
Source 1’s serving tray adaptations demonstrate how basic skills scale beautifully. Try these advanced designs:
- 3D layering: Stack tiles for shadow effects
- Metal inlays: Copper strips add luminous contrast
- Glow elements: Phosphorescent tesserae shine at night
Seasonal themes keep your practice engaging. Frosted glass mimics winter ice, while autumn palettes use rust-colored mosaic pieces. Document color schemes for yearly repetition.
Beyond Traditional Materials
Mixed media expands your art vocabulary. Quilled paper inserts add delicate texture between tiles. For jewelry projects, miniature versions work as pendants.
Community collaborations bring fresh perspectives:
- Host a tile-swap with local artists
- Create a public installation piece
- Teach workshops using your designs
Every project fuels new ideas. Let each finished piece inspire the next evolution of your creativity.
Caring for Your Mosaic Art
Preserving your artwork requires the right care techniques. Regular maintenance protects both aesthetics and structural integrity. Follow these methods to ensure your mosaic remains stunning for years.
Cleaning and Maintenance
Source 2 recommends pH-neutral cleaners for stone like marble. Mix 1 tsp mild dish soap with 1 quart warm water for a safe DIY solution. Avoid vinegar or lemon juice—these etch surfaces over time.
Use a soft toothbrush for grout lines. Gentle circular motions remove dirt without scratching. For outdoor pieces, prevent frost damage by applying sealant before winter.
Steer clear of these damaging items:
- Abrasive pads or steel wool
- Bleach-based products
- High-pressure washers
Repairing Damaged Tiles
Spot replacements save time versus full reworks. Lift chipped tiles with a heated palette knife. Clean the area thoroughly before adhering new pieces.
Treat efflorescence (white mineral deposits) with a 1:10 muriatic acid solution. Rinse immediately after application. For hairline cracks, epoxy resin provides invisible fixes.
Source 2’s lifetime warranty covers material defects. Register your mosaic within 30 days of purchase. Proper care maximizes both protection and longevity for your cherished items.
Conclusion
Your journey into mosaic art doesn’t end here. Each mandala piece you create fosters mindfulness, turning tiles into a meditative practice. As skills grow, experiment with larger designs or mixed textures.
Store leftover materials in labeled containers to keep your workspace ready. Share finished projects online—your creativity might inspire others. Watch for trends like metallic accents or 3D layering to elevate future work.
Explore The Mosaic Store’s kits for curated supplies. Whether for home decor or personal joy, every artistic effort adds beauty to the world. Keep creating—your next masterpiece awaits.