Looking for a fun and creative way to add vintage charm to your home? Mercury glass offers a timeless aesthetic that’s easier to achieve than you might think. With just a few supplies, you can create stunning decor pieces that mimic the elegance of authentic designs.
This DIY project is not only budget-friendly but also quick to complete. In just 30 minutes, you can transform ordinary items into eye-catching accents for shelves, tabletops, or walls. The secret lies in a unique technique that creates an authentic mottled look.
Whether you’re a seasoned crafter or a beginner, this spray paint method is simple and rewarding. Plus, you can customize the finish to suit your style, adding an optional aged effect for extra character. Ready to get started? Let’s dive into this creative journey!
Introduction to Faux Mercury Glass
Discover the fascinating history behind mercury glass and how it’s made. Originating in 19th-century Germany, this decorative technique was created as a safer alternative to traditional mirrors. Authentic versions use double-walled construction with a silver solution, giving them their signature reflective mirror effect.
Modern DIY methods replicate this look using simple materials like vinegar and mirror spray. These techniques create the same mottled surface and dark speckles that make mercury glass so unique. Whether you’re updating a bar cart or transforming a lantern, the results are stunning.
The popularity of DIY mercury glass has soared in recent years, thanks to platforms like Pinterest. It’s a safe and affordable way to add a vintage touch to your home. From holiday decor to furniture upgrades, the possibilities are endless.
Here’s a quick comparison of traditional and modern methods:
| Aspect | Traditional Mercury Glass | Modern DIY Version |
|---|---|---|
| Materials | Silver solution, double-walled glass | Mirror spray, vinegar |
| Safety | Potential hazards | Non-toxic and safe |
| Time | Labor-intensive | Quick and easy |
For more insights into the history and techniques of mercury glass, check out this detailed guide. With the right materials and a bit of creativity, you can achieve a professional-looking finish that’s both durable and versatile.
Materials You’ll Need
Ready to gather your supplies for this creative project? Here’s everything you’ll need to achieve that stunning reflective finish. Start with the basics: mirror spray, distilled white vinegar, and distilled water. These are the core ingredients for creating the signature mottled effect.
For tools, you’ll need a spray bottle with a mist setting to apply the vinegar solution evenly. Lint-free cloths are essential for blotting and smoothing the surface. Before starting, clean your glass with isopropyl alcohol to ensure proper adhesion.

When it comes to spray paint, two popular brands stand out: Krylon Looking Glass and Rust-Oleum Mirror Effect. Krylon offers a finer mist, ideal for detailed projects, while Rust-Oleum provides a heavier application for a more dramatic finish. Both are excellent choices, so pick based on your preference.
Safety is key. Wear an N95 mask and work in a well-ventilated area to avoid inhaling fumes. If you’re adding an aged look, consider using black acrylic paint for subtle detailing. For frosted effects, Martha Stewart Frosted Glass Paint is a great option.
Here’s a quick comparison of the two main spray paint brands:
| Aspect | Krylon Looking Glass | Rust-Oleum Mirror Effect |
|---|---|---|
| Mist Quality | Finer mist | Heavier application |
| Ease of Use | Tight lid (requires flathead screwdriver) | Standard lid |
| Price | $9 for 6oz | $8 for 11oz |
For cost-saving tips, reuse household items like newspaper to protect your workspace. Instead of expensive custom-cut tempered glass, opt for affordable picture frame glass. With these materials and tools, you’re all set to create stunning decor pieces!
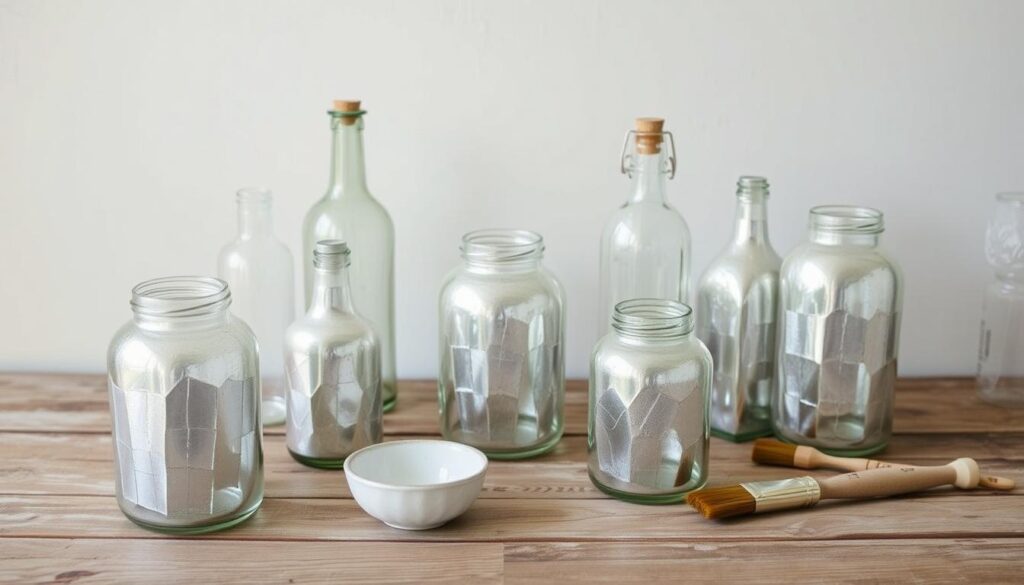
Step-by-Step Faux Mercury Glass Tutorial Using Mirror Spray and Vinegar
Transform ordinary items into stunning decor with this simple technique. Follow these steps to achieve a professional finish with minimal effort and time. Each stage is designed to help you create a beautiful, reflective surface that mimics the elegance of authentic designs.
Step 1: Prepare Your Workspace
Start by setting up your workspace. Choose a well-ventilated area or work outdoors to avoid inhaling fumes. Lay down newspaper or a drop cloth to protect surfaces. Gather all materials, including mirror spray paint, a spray bottle, and distilled white vinegar.
Step 2: Apply the Mirror Spray Paint
Shake the spray can thoroughly for at least one minute. Hold it 6-8 inches away from the glass and apply in a crosshatch pattern for even coverage. Allow the first coat to dry for about a minute if using Krylon, or longer for Rust-Oleum. Repeat for 3-5 thin coats, ensuring each layer dries completely.
Step 3: Use the Vinegar Solution
Mix equal parts distilled white vinegar and water in a spray bottle. Lightly mist the painted surface, creating small spots. This step helps achieve the mottled effect characteristic of mercury glass. Experiment with full-strength vinegar for a more dramatic look.
Step 4: Blot and Repeat
Use a crumpled paper towel to gently blot the surface. This technique removes excess liquid and enhances the speckled texture. Repeat the vinegar application and blotting process until you achieve the desired effect. For Krylon, expect finer speckles, while Rust-Oleum produces larger flakes.
Step 5: Add Final Touches
Once satisfied with the texture, let the piece dry completely. For an aged look, lightly mist black acrylic paint over the surface. Allow the project to cure for 24 hours before handling. This ensures durability and a professional finish.
| Aspect | Krylon Looking Glass | Rust-Oleum Mirror Effect |
|---|---|---|
| Drying Time | 1 minute per coat | 5-10 minutes per coat |
| Application | Finer mist, tight lid | Heavier application, standard lid |
| Texture | Small speckles | Large flakes |
Tips for Success
Achieving a professional finish for your DIY project requires attention to detail and a few expert tips. Whether you’re using Krylon Looking Glass or another brand, these suggestions will help you create a stunning mercury glass look.
Proper ventilation is crucial. Krylon’s strong fumes can spread quickly, so work in a well-ventilated area or outdoors. A basement project once caused a house-wide smell, so take precautions to avoid this issue.
Surface preparation is key. Ensure your glass is grease-free by cleaning it with isopropyl alcohol. This step guarantees better adhesion for the paint and a smoother finish.
Temperature matters. Aim for a working range of 70-80°F. Extreme temperatures can affect the drying process and the final texture of your piece.

Maintain your spray nozzle. Clean it with acetone after each use to prevent clogs. This ensures consistent application for future projects.
Customize your design. Add gold leaf accents or stenciled patterns for a unique touch. These details elevate the mercury glass look and make your creation stand out.
Repair damaged areas with touch-up techniques. Lightly reapply the paint and vinegar solution to blend imperfections seamlessly.
Choose the right glass thickness for your project. Here’s a quick guide:
| Project Type | Recommended Glass Thickness |
|---|---|
| Picture Frames | 1/8 inch |
| Tabletops | 1/4 inch |
| Lanterns | 3/16 inch |
Store leftover mirror spray properly. Keep it in a cool, dry place with the nozzle removed to prevent drying out.
Handle sharp glass edges with care. Use gloves and protective gear to avoid injuries during your project.
Finally, consider community suggestions. Many DIY enthusiasts share valuable tips online, so explore forums and comment sections for additional inspiration.
Conclusion
Transform your home with a touch of vintage elegance using this simple DIY method. Mercury glass projects are not only affordable but also safe and versatile. With materials costing under $20, you can create stunning decor that elevates any space.
Experiment with different objects to achieve unique results. From holiday centerpieces to photo backdrops, the possibilities are endless. Upcycle glass jars and bottles for an eco-friendly twist.
To maintain your creations, use gentle cleaning methods. Avoid harsh chemicals to preserve the reflective look. Share your results on social media to inspire others and connect with fellow DIY enthusiasts.
Stay tuned for upcoming tutorials on related projects. For specialty glass supplies, check out our recommended resources. We’re committed to ethical practices, ensuring transparency in all affiliate partnerships.