Working with fused glass can be incredibly rewarding, but it’s not without its challenges. One of the most frustrating issues you might face is defects like cracks or bubbles during the firing process. These imperfections can ruin hours of hard work and leave you searching for answers.
Understanding how your kiln operates is crucial to avoiding these problems. Uneven heating, rapid temperature changes, or using incompatible materials can all lead to defects. For example, trapped air between layers or improper shelf leveling often causes bubbles to form.
Thankfully, there are solutions. Adjusting firing rates, ensuring shelves are level, and using compatible glass can make a significant difference. By mastering these techniques, you can create stunning pieces without the frustration of defects.
Understanding Common Kiln Issues with Glass
Creating fused glass art requires precision and attention to detail. Even small mistakes during the firing process can lead to defects like bubbles or cracks. Understanding why these issues occur is the first step toward preventing them.
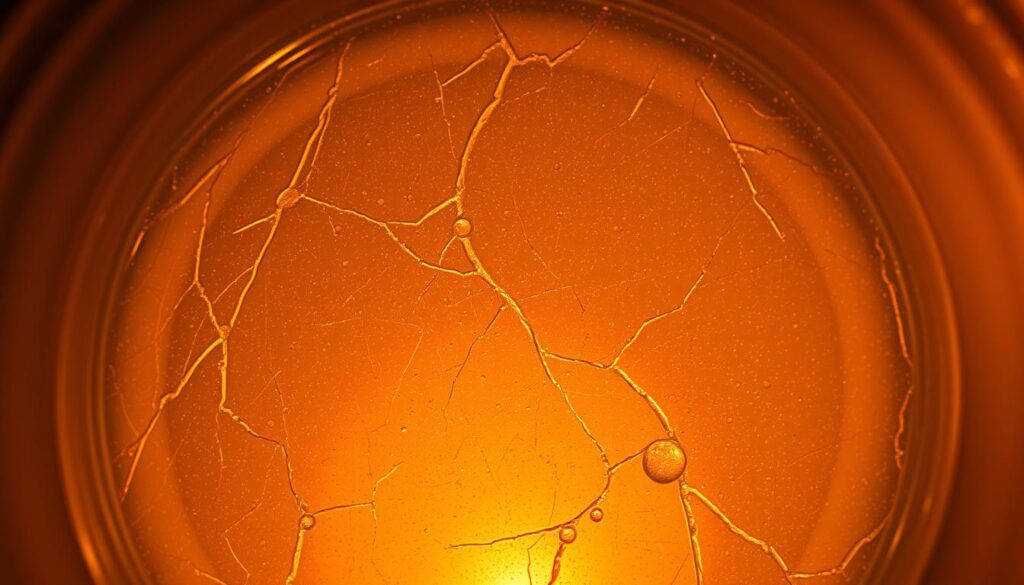
Why Glass Cracks and Bubbles Occur
Bubbles often form when air gets trapped between layers of glass or under uneven shelves. This trapped air expands during firing, creating unwanted pockets. Uneven heat distribution can also cause bubbles, especially if the kiln shelf isn’t level.
Thermal shock is another common problem. It happens when the glass heats or cools too quickly, causing stress cracks. Rapid temperature changes can make the glass expand or contract unevenly, leading to visible flaws.
Compatibility issues arise when different types of glass are used together. If the layers have mismatched COE (Coefficient of Expansion), they expand at different rates. This mismatch creates internal stress, often resulting in sharp, angular breaks after cooling.
The Importance of Proper Kiln Setup
A well-set-up kiln is essential for consistent results. Start by ensuring the shelf is perfectly level. Uneven shelves can trap air and cause bubbles. Proper element placement is also crucial. Top and side heating elements should distribute heat evenly across the glass.
Using compatible materials is another key factor. Always check the COE of your glass before layering. Mismatched glass can lead to breaks, as Lisa Vogt’s work demonstrates. Her examples show how incompatibility creates sharp edges and internal stress.
By addressing these issues, you can minimize defects and create stunning fused glass pieces. Proper setup and material selection are the foundation of successful glass fusing.
How to Prevent and Fix Bubbles in Fused Glass
Preventing imperfections in fused glass starts with proper kiln management. Bubbles often form due to trapped air or uneven heat distribution. By addressing these issues, you can create flawless pieces every time.

Checking and Leveling Your Kiln Shelf
A level kiln shelf is crucial for even heat distribution. Use a ruler to check for flatness. If the shelf is uneven, flip it to find the flattest side. This simple step can prevent air pockets and ensure consistent results.
Adjusting Firing Temperature and Time
Firing at lower temperatures with longer holds allows air to escape. Add a 60-minute hold at 1300°F to soften the glass uniformly. This technique eliminates trapped air and reduces the risk of bubbles.
Using the Right Firing Schedule
Slower ramp rates, such as 300°F/hour, prevent rapid expansion. Include holds every 250°F to balance heat. For project-specific speeds, refer to Skutt’s GlassFire Mode guidelines. These adjustments ensure a smooth process and high-quality results.
By mastering these techniques, you can minimize defects and create stunning fused glass pieces. Proper setup and firing schedules are the foundation of success.
Solving Thermal Shock Cracks in Glass
Thermal shock can disrupt even the most carefully planned glass projects. This issue occurs when the material heats or cools too quickly, causing stress and cracks. Understanding the causes and solutions can help you achieve flawless results.
Identifying the Cause of Thermal Shock
Thermal shock often happens during rapid temperature changes. If your piece has soft-edged cracks, it likely cracked during heating. Sharp-edged cracks usually indicate cooling-phase breaks. Testing your kiln elements can help identify failures causing these issues.
Choosing the Right Kiln for Your Project
For tall or thick pieces, use a kiln with top and side heating elements. This ensures even heat distribution, reducing the risk of thermal stress. Skutt kilns, for example, are designed to handle such projects effectively.
Slowing Down the Firing Rate
Slower ramp rates minimize stress on the glass. Below 1000°F, reduce the speed to prevent rapid expansion. During cooling, gradual temperature drops are essential. Programs like Skutt’s Ramp/Hold Mode with segmented holds work well for large pieces.
Lisa Vogt’s 12” bowl is a great example. Fired at 300°F/hour, it achieved success without cracks. By adjusting your firing schedule, you can create stunning, stress-free pieces every time.
Addressing Other Common Kiln Problems
Mastering the art of fused glass involves more than just creativity; it requires solving common kiln issues. From sticking glass to improper annealing, these challenges can disrupt your project and lead to frustrating results. By understanding and addressing these problems, you can ensure smoother firing processes and higher-quality art.

Preventing Glass from Sticking to the Kiln Shelf
One of the most common issues is glass sticking to the kiln shelf. To avoid this, apply a thin, even layer of kiln wash. Overapplication can lead to flaking, which ruins the surface. Ensure the wash is smooth and free of lumps for a non-stick effect.
Ensuring Proper Annealing to Avoid Cracks
Proper annealing is crucial for relieving internal stress in your piece. Hold the temperature at 950-960°F for at least 40 minutes, depending on the size of your project. Afterward, cool slowly to 500°F to prevent cracks. This process ensures your glass remains durable and intact.
Compatibility Issues Between Glass Layers
Mixing incompatible glass layers can lead to breaks after cooling. Always store glass by its COE and verify labels before use. For example, Lisa Vogt’s 12-foot wall sculpture failed due to undetected incompatibility. Use manufacturer firing guides, like System 96®, to ensure proper compatibility and schedule.
By addressing these issues, you can enhance your art and avoid common pitfalls. For more tips on perfecting your craft, explore the art of fusing and slumping glass.
Conclusion
Perfecting your fused glass art involves mastering both creativity and technical precision. By leveling shelves, adjusting firing schedules, and using compatible glass layers, you can minimize defects and achieve stunning results. Always test your kiln elements and follow manufacturer guidelines to ensure optimal performance.
Lisa Vogt’s advice to avoid peeking during cooling and embrace experimentation is invaluable. Her insights highlight the importance of patience and precision in the process. For the best tools and recommendations, consider Soul Ceramics’ kiln solutions to enhance your project outcomes.
Apply these solutions confidently and watch your art thrive. With the right techniques and tools, you can create flawless pieces that reflect your skill and vision.