Creating stained glass art requires specific supplies that can be overwhelming for beginners. Understanding the essential tools versus the nice-to-have ones can help manage your initial investment.
The process involves several stages, each requiring unique tools to transform flat glass into artistic creations. This guide will walk you through the necessary tools and supplies for each phase, from pattern making to final finishing.
Whether you’re using the copper foil method or lead came technique, having the right supplies will significantly impact your finished projects. Initial investment can range from $300 to $1,000+, but starting with fundamental tools is feasible.
Understanding the Stained Glass Creation Process
Before diving into stained glass creation, you need to grasp the fundamental techniques involved. The stained glass creation process is complex and involves several stages, from designing the pattern to finishing the final product.
Copper Foil vs. Lead Came Methods
The stained glass creation process typically follows two main methods: the copper foil technique, also known as the Tiffany method, ideal for smaller decorative pieces, and the lead came method, suited for larger architectural installations. The copper foil method involves wrapping each piece of glass with adhesive copper tape and then soldering the pieces together. In contrast, the lead came method uses H-shaped lead channels to hold glass pieces together, providing structural integrity for larger windows.
Basic Workflow Stages
The basic workflow stages for stained glass creation include pattern design, glass cutting, grinding edges, applying copper foil or lead came, soldering, and finishing with patina and polish. Each stage builds upon the previous one, requiring careful attention to detail and specific tools to achieve professional results.
| Stage | Description | Tools Required |
|---|---|---|
| Pattern Design | Creating the design for the stained glass piece | Paper, pencil, ruler |
| Glass Cutting | Cutting glass according to the pattern | Glass cutter, cutting oil |
| Soldering | Joining the glass pieces together | Soldering iron, solder |
Initial Investment Considerations
When starting out, it’s crucial to consider the initial investment. You can begin with essential tools and gradually build your collection. Many local studios offer classes where tools are provided or can be rented. The initial investment can range from $500 to $1,000 for everything, although deals can be found to lower this cost.
Essential Safety Equipment for Stained Glass Work

Stained glass work involves several hazards that necessitate proper safety equipment. Working with glass can be hazardous, with risks ranging from cuts and eye injuries to inhalation of harmful dust and fumes.
Eye Protection
Eye protection is crucial when working with stained glass, as tiny glass shards can cause serious eye injuries. High-quality safety glasses or goggles should be worn during cutting, breaking, and grinding operations to prevent eye damage.
Cut-Resistant Gloves
Handling sharp glass edges requires cut-resistant gloves to protect your hands. Specialized gloves are available that provide protection without compromising dexterity. For added comfort during grinding, consider wearing nitrile gloves under your cut-resistant gloves.
Respiratory Protection
Respiratory protection is necessary to prevent inhalation of glass dust and lead fumes during soldering. A proper respirator with appropriate cartridges is recommended for lead work, rather than a simple dust mask.
Workspace Safety Considerations
Maintaining a safe workspace involves more than just personal protective equipment. Ensure proper ventilation, designate clean areas for food and drinks, and implement regular cleaning protocols to prevent accumulation of glass dust and lead particles. For more information on designing a safe and efficient workspace, visit our guide on designing stained glass.
Planning and Pattern Making Tools

To bring your stained glass vision to life, you’ll need the right tools for planning and pattern making. This stage is the foundation of any successful project, requiring specific tools and supplies to create accurate templates.
Pattern Materials and Templates
Pattern materials typically include tracing paper, cardstock, and carbon paper. You’ll need two copies of each pattern—one as a reference guide and one to cut into individual pattern pieces. When selecting patterns, consider the complexity of the design and your skill level.
Drawing and Tracing Supplies
Drawing and tracing supplies such as pencils, erasers, rulers, and framing squares help ensure accurate pattern creation. A light box or tracing box is extremely helpful for transferring designs to paper and examining glass colors and textures.
Project Boards and Layout Systems
Project boards provide a stable surface for assembling your glass pieces according to the pattern. Options include cork boards, homasote boards, or specialized layout systems with adjustable borders and pins to keep your project square and properly aligned.
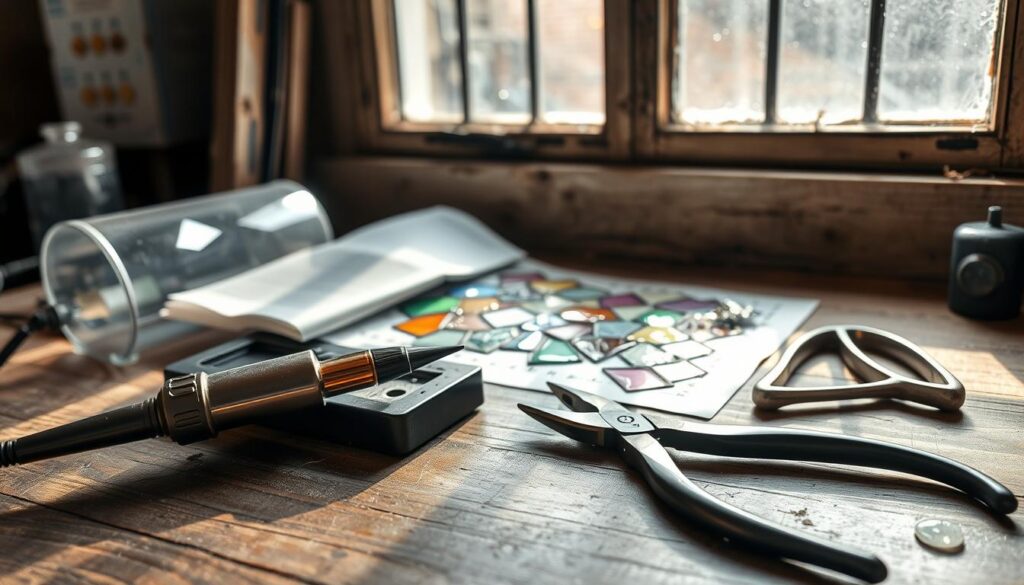
Glass Cutting Tools and Supplies

Effective glass cutting is crucial for stained glass artists, and it begins with the right equipment. Glass cutting involves scoring the glass surface with specialized tools rather than actually cutting through it. This precise process requires a good understanding of the various tools available.
Glass Cutters: Types and Features
Glass cutters come in various styles, including pencil grip, pistol grip, and thumb-and-finger grip models. Each type offers different levels of control and comfort depending on your hand size and preference. The quality of your glass cutter significantly impacts your cutting success. Premium cutters feature self-oiling reservoirs, tungsten carbide cutting wheels, and ergonomic designs that reduce hand fatigue. You can explore a variety of glass cutters to find the one that suits your needs.
Cutting Oil and Accessories
Cutting oil is essential for lubricating the cutter’s wheel as it scores the glass. This lubrication creates cleaner score lines that break more predictably and extends the life of your cutting wheel. Using the right cutting oil is a must for achieving professional results in your stained glass work.
Breaking and Grozing Pliers
After scoring, specialized pliers are used to break the glass along the score line. Running pliers are designed for straight breaks, while groizing pliers are used for curved cuts and removing small pieces. Running pliers have a curved jaw that applies even pressure to both sides of the score line, causing the glass to break cleanly. Grozing pliers feature serrated jaws that grip the glass firmly, allowing you to break off small sections and nibble away excess glass.
Waffle Grids and Work Surfaces
A proper work surface is crucial for safe and effective glass cutting. Waffle grids provide an ideal work surface as they catch glass shards and prevent them from scratching your glass sheets or work table. Your work surface should be flat, clean, and covered with a material that provides some cushioning while still being firm enough to support the glass during scoring.
Grinding Equipment for Perfect Edges

To ensure your stained glass artwork fits together seamlessly, you’ll need the right grinding equipment. A grinder is essentially a mini wet sander that helps you refine the edges of your glass pieces.
Grinder Types and Price Points
Glass grinders come in various types and price points. Basic models for beginners are available for around $100-150, while professional-grade machines with advanced features like variable speeds and built-in lights can cost between $300-500.
The Techniglass grinder is highly recommended by professionals for its reliability and smooth operation.
Grinding Bits and Their Uses
Grinding bits are available in different sizes and grits. Standard 1-inch bits are commonly used for general work, while smaller bits (1/4-inch or 1/8-inch) are ideal for intricate details and inside curves.
Fine grit bits produce smoother edges but remove glass more slowly, whereas coarser grits remove material faster but may require additional finishing.
Manual Grinding Alternatives
For those who cannot invest in an electric grinder or need to make minor adjustments, manual grinding alternatives like diamond hand pads, silicon carbide stones, and diamond files are available.
Regular maintenance of your grinder, including cleaning the water reservoir and replacing worn bits, is crucial for optimal performance.
Copper Foiling Tools and Techniques

To achieve professional-looking stained glass pieces, understanding copper foiling tools and techniques is essential. Copper foiling is a method that involves wrapping the edges of each glass piece with adhesive copper tape before soldering them together. This technique allows for more intricate designs and finer solder lines compared to traditional lead came construction.
Copper Foil Types and Widths
Copper foil comes in various widths, ranging from 3/16″ to 7/32″ to 1/4″ and beyond. The width selection depends on the thickness of your glass and the desired appearance of your solder lines. For beginners, 7/32″ or 1/4″ copper foil is recommended as it provides enough coverage for minor imperfections in cutting and grinding.
Copper foil is available with different backing colors: black, copper, or silver. The backing color should be chosen based on your intended patina finish. For instance, black backing is ideal for black patina, while copper backing suits copper patina.
Foil Application Tools
Essential foil application tools include a fid or burnisher, which can be made of plastic, bone, or even a Sharpie marker barrel. These tools are used to press the foil firmly against the glass edge to ensure proper adhesion. An X-acto knife or box cutter is also useful for trimming excess tape at corners and making clean overlaps.
Backing Colors and When to Use Them
The backing color of copper foil should match your intended patina finish. Black backing is used for black patina, copper backing for copper patina, and silver backing for a bright finish. Edco brand copper foil is highly recommended for its superior adhesive quality and malleability.
By choosing the right copper tape and application tools, you can achieve smooth and professional-looking results in your stained glass projects.
Essential Stained Glass Tools for Soldering

The art of soldering is where your stained glass project comes together, requiring precision and the right equipment. Soldering is often considered the most challenging aspect of stained glass creation, requiring practice and the right tools to achieve smooth, strong connections between glass pieces.
Soldering Irons and Temperature Control
A quality temperature-controlled soldering iron is the most critical investment for successful stained glass work. Soldering irons for stained glass typically range from 80-100 watts with temperature control capabilities between 700-800°F (370-425°C) for optimal solder flow. The Hakko FX601 Adjustable Temperature Controlled Soldering Iron is highly recommended for its consistent heat and ergonomic design.
Solder Types: Lead vs. Lead-Free
The choice between lead and lead-free solder is important. Traditional 60/40 lead solder (60% tin, 40% lead) flows more easily and at lower temperatures than lead-free alternatives. However, lead-free solder, while more environmentally friendly and safer to handle, typically contains higher silver content, requires higher working temperatures, and can be more challenging to work with, especially for beginners.
Flux and Application Methods
Flux is an essential chemical that cleans the copper foil surface and allows solder to flow and adhere properly. It is available in paste, gel, or liquid forms, with gel being preferred by many artists for its ease of application. Proper flux application involves using a small brush to apply a thin, even coat to all copper foil surfaces before soldering.
To ensure optimal soldering results, it’s also crucial to maintain your soldering iron tip with a cleaning pad and to have proper ventilation to remove potentially harmful flux fumes and lead vapors.
Finishing and Patina Application Tools

As you near the completion of your stained glass project, the finishing stage is where your hard work pays off through meticulous cleaning, patina application, and protective polishing. This stage is crucial as it transforms your raw, soldered assembly into a beautifully finished product.
Cleaning Supplies for Proper Preparation
Thorough cleaning of your soldered piece is essential before applying patina. Any remaining flux residue can prevent proper patina adhesion and continue to corrode solder joints over time. Essential cleaning supplies include Dawn dish soap and old toothbrushes for scrubbing solder lines, as well as specialized flux removers like Kwik Clean. For stubborn residue, melamine sponges (Magic Erasers) and 0000 steel wool can be used.
Patina Types and Application Tools
Patina is a chemical solution that reacts with the solder to change its color, with black and copper being the most common finishes. Novacan black patina and copper patina are industry standards. When applying patina, it’s crucial to work in a well-ventilated area and wear protective gloves to avoid skin contact. Use toothbrushes for black patina and cotton swabs for the more delicate copper patina application.
Polishing and Protective Finishes
After patina application and thorough rinsing, a protective finishing compound such as Clarity’s Stained Glass Finishing Compound or Pledge Enhancing Polish should be applied. The polishing process involves allowing the compound to dry completely before buffing with a microfiber cloth. This creates a protective barrier that enhances the patina color and prevents tarnishing.
Must-Have Tools for Beginners on a Budget
You can begin creating beautiful stained glass art without a significant initial investment. By focusing on the essentials and gradually adding more tools to your collection, you can manage your budget effectively while still producing high-quality pieces.
Absolute Essentials vs. Nice-to-Haves
For beginners, it’s crucial to distinguish between the absolute essentials and nice-to-have tools. The basic toolkit includes a Glass Scoring Tool, Glass Scoring Oil, Running and Grozer Pliers, Copper Foil, a temperature-controlled Soldering Iron, Solder, Flux, and basic safety equipment. This foundational set allows you to complete simple projects and totals around $300.
While a grinder is extremely helpful for smoothing edges, beginners can initially use manual grinding stones or diamond hand pads as an alternative. Investing in quality tools for cutting and soldering will save you significant time and frustration. Other tools can be added gradually as your skills develop and projects become more complex.
Where to Find Affordable Tools
Affordable tools can be found through various channels. Online marketplaces like Facebook Marketplace or Craigslist often have retiring hobbyists selling complete tool sets at discounted prices. Local stained glass studios frequently offer starter kits with basic tools at reasonable prices and may even rent tools to students who have taken their classes.

Tool Quality Considerations
When considering tool quality, focus on durability and performance for frequently used items like cutters, pliers, and the soldering iron. Accessories can be more budget-friendly. Some tools, such as scissors and brushes, can be repurposed from household items, while specialized tools should be purchased new from reputable brands.
Attending a beginner’s class before buying tools can be beneficial, allowing you to try different types and brands. This hands-on experience helps you make informed decisions about which tools suit your hand size and working style best.
Advanced Stained Glass Tools for Serious Crafters

As you progress in your stained glass journey, you’ll discover advanced tools that can elevate your craft. These tools are designed to save you time, improve precision, and increase efficiency, allowing you to take on more complex projects.
Time-Saving Specialty Tools
Time-saving specialty tools are a game-changer for serious stained glass artists. A copper foil dispenser is one such tool that simplifies the foiling process by holding the roll and applying it directly to the glass edge in one smooth motion. Other examples include glass cutting systems with adjustable guides that enable precise cutting of straight lines, circles, and curves.
These tools not only reduce the time spent on repetitive tasks but also improve the overall quality of your work. For instance, a copper foil dispenser ensures consistent foil application, reducing the likelihood of errors.
Precision and Efficiency Upgrades
Upgrading your tools can significantly enhance your precision and efficiency. Advanced grinders with variable speed controls and built-in lighting allow for more detailed grinding work. Specialty soldering tools like third-hand holders keep pieces in place during soldering, while soldering aids like flux pens provide more precise application.
Other precision and efficiency upgrades include ring saws or band saws designed specifically for glass cutting, which enable intricate interior cuts and complex shapes. Light tables with adjustable brightness settings are also invaluable for pattern tracing and checking for gaps or flaws in foiled pieces before soldering.
Investing in these advanced stained glass tools can pay for themselves through time savings, reduced material waste, and the ability to create more complex, higher-value pieces. As your skills advance, incorporating these tools into your workflow can significantly improve your overall productivity and artistry.
Where to Buy Stained Glass Supplies

To bring your stained glass visions to life, you need to know where to find the best materials. The quality of your stained glass supplies significantly impacts both the creation process and the final results of your projects.
Local Stained Glass Shops
Local stained glass shops offer several advantages, including the ability to see and select glass in person, get personalized advice from experienced staff, and avoid shipping costs for heavy glass sheets. Supporting these local businesses also helps maintain the stained glass community in your area.
Online Retailers and Specialty Stores
Online retailers like Delphi Glass and Anything in Stained Glass offer extensive selections of glass, tools, and supplies that may not be available locally. When shopping online, look for retailers that provide detailed descriptions of glass texture, opacity, and color variations, as well as good packaging practices to prevent breakage during shipping.
Glass Selection Tips
When selecting glass, consider not just the color but also the texture, opacity, and thickness. High-quality glass brands like Oceanside, Spectrum, Bullseye, and Wissmach are worth the investment for their consistent thickness and superior cutting properties. For beginners, starting with medium-textured, medium-thickness glass is recommended.
Building relationships with suppliers can lead to benefits like being notified when rare glass becomes available and receiving advice on suitable glass for specific projects.
Conclusion
The world of stained glass is filled with creativity and precision, and having the right tools is key. As you get started on your journey, understanding the essential stained glass tools needed for each phase of creation is crucial.
While the initial investment may seem substantial, starting with quality basics and gradually adding specialized tools as you develop your skills is a practical approach. Safety should always be your priority when working with glass, copper foil, and lead, so make sure to invest in proper protective equipment.
The copper foil method is an accessible entry point for beginners, requiring fewer specialized tools than the lead came method. As you gain experience, you’ll develop preferences for specific tools and techniques that suit your style and projects. With practice and the right tools, creating stained glass art becomes more intuitive and rewarding.
Remember, many accomplished artists started with minimal tools and built their collections over time. The stained glass community is supportive, offering advice through local classes and online forums. With the right tools and practice, you’ll be able to express your creativity through this timeless medium, transforming simple sheets of glass into beautiful, light-catching art.