Transforming your living space with a touch of coastal beauty is now within reach. Sea glass mosaics combine the natural allure of tumbled glass with artistic design, creating stunning pieces that evoke the tranquility of the ocean.
By undertaking this project, you can personalize your home with a unique piece that captures the serene beauty of the sea. Whether you’re a seasoned crafter or a complete beginner, this guide will walk you through the process of creating a mosaic table or tray that showcases your creativity.
This comprehensive tutorial is designed to help you achieve professional-looking results, bringing the beach aesthetic into your home decor. With this step-by-step guide, you’ll be able to create a beautiful piece that adds a touch of coastal charm to your living space.
The Beauty and Appeal of Sea Glass Mosaics
The beauty of sea glass mosaics is rooted in the natural process that creates these stunning pieces of glass. Sea glass is formed when discarded glass is tumbled and smoothed by ocean waves and sand over many years.
What Makes Sea Glass Special
Sea glass possesses a unique frosted appearance and smooth texture that comes from years of being tumbled by sea waves and sand. This natural weathering process transforms ordinary glass into something extraordinary.
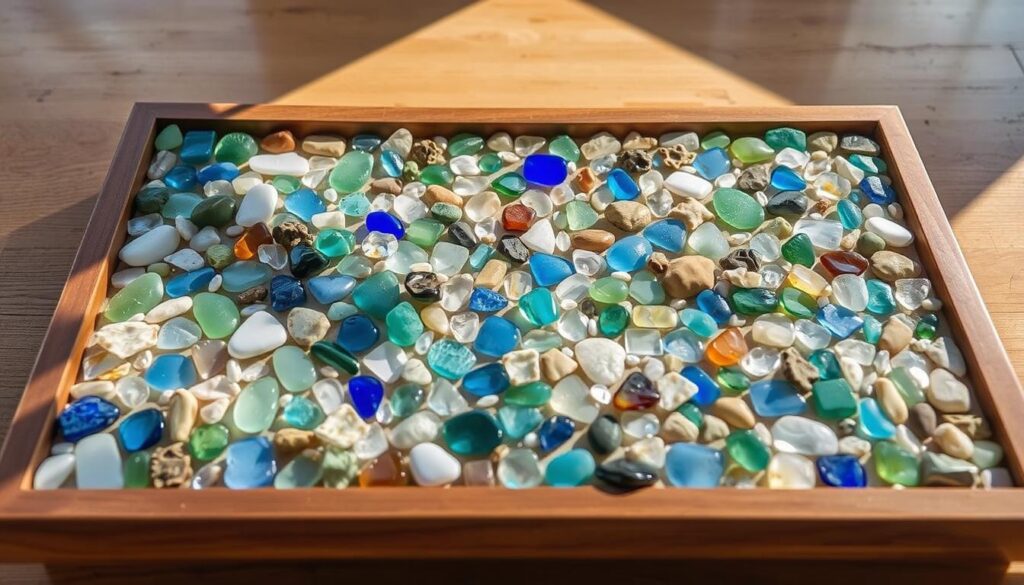
The colors of sea glass range from common greens and browns to rarer blues, purples, and reds. Each hue has its own special appeal and value among collectors and crafters.
Benefits of Creating Your Own Sea Glass Project
Creating your own sea glass projects allows you to bring the calming essence of the beach into your home while expressing your creativity through a unique medium. Working with sea glass can be a meditative and rewarding craft experience.
Popular Uses for Sea Glass Mosaics in Home Decor
Sea glass mosaics have gained popularity in home decor for their ability to add texture, color, and a coastal aesthetic to various items. You can use them to create beautiful mosaic tabletops, trays, picture frames, and wall art.
The versatility of sea glass makes it suitable for both simple beginner projects and complex artistic creations.
Materials and Tools You’ll Need

The success of your sea glass mosaic depends on having the right materials and tools at your disposal. To create a beautiful and durable piece, you’ll need to gather specific supplies.
Essential Materials List
To start, you’ll need sea glass pieces in various colors and sizes. The quality and variety of your sea glass will significantly impact the final appearance of your mosaic. You’ll also need a suitable base, such as a tabletop or tray, adhesive that dries clear (like Weldbond Glue), grout appropriate for the spacing between your glass pieces, and a waterproof sealant to protect your finished project.
Tools for the Project
Essential tools include a measuring tape to measure your base and plan your design, a pencil for marking the design on your base, a small spatula or putty knife for applying grout, sponges for cleaning excess grout, and protective gloves to safeguard your hands from grout and adhesive. If you need to shape your glass pieces, a tile nipper can be very useful.
Where to Find or Purchase Sea Glass
Finding sea glass can be an adventure. Beaches with rocky shores and strong currents often yield the best results, especially after storms. However, be sure to check local regulations regarding the removal of natural materials from beaches.
Beach Collection Tips
When collecting sea glass from beaches, be respectful of the environment and other beachgoers. Look for areas where the sea glass tends to accumulate, such as near tidal pools or at the high tide mark.
Store-Bought Alternatives
If beachcombing isn’t an option, you can purchase sea glass at craft stores or online retailers. These alternatives offer consistent sizes, shapes, and colors.
How to Make Your Own Sea Glass
If you’re unable to find sea glass, you can make your own by tumbling glass pieces in a rock tumbler or by manually frosting them with sandpaper. For a detailed guide, you can visit this tutorial.
Selecting and Preparing Your Base
When starting your sea glass mosaic project, one of the most critical decisions you’ll make is choosing the right base. The base of your mosaic serves as the foundation upon which your entire artwork is built, making its selection and preparation crucial for the project’s success.
Choosing the Right Table or Tray
Selecting the right table or tray for your sea glass mosaic involves considering both aesthetic appeal and practical functionality. You can choose from various materials such as wood, metal, or even concrete. Wooden tables are popular due to their ease of use and good adhesion properties for sea glass pieces. However, they may require sealing to prevent damage from moisture. Metal bases, on the other hand, offer durability but might need their surface roughened for better adhesive grip.
The condition of your chosen base is also vital. Ensure it’s stable and repair any damages before you begin. For instance, if you’re using a wooden table top, check for any warping or cracks that could affect your mosaic’s integrity.

Surface Preparation Techniques
Once you’ve selected your base, thorough preparation is key. Start by cleaning the surface to remove dirt, dust, or any residue that could interfere with adhesion. For wooden surfaces, a light sanding can help create a better bonding surface for your sea glass mosaic pieces. If your base has a glossy finish, sanding it will also help the adhesive bond more effectively.
For metal or other non-porous surfaces, you may need to roughen the surface to ensure a strong bond between the base and the sea glass. This step is crucial for the longevity of your mosaic artwork.
Creating a Work Plan
Before you start applying your sea glass mosaic, creating a detailed work plan is essential. Measure the surface area of your base to determine how much sea glass and other materials you’ll need. Sketching your design to scale can help you visualize the final product and make necessary adjustments before you begin.
Consider the size and shape of your base in relation to your design. Larger surfaces allow for more elaborate patterns but require more materials and time. If your table has a removable top, consider working on it separately before reattaching it to the base, which can simplify the application process.
How to Create a Sea Glass Mosaic Tabletop or Tray
As you embark on your sea glass mosaic project, the first step is to plan a design that not only reflects your personal style but also complements the shape and size of your table or tray. This initial planning phase is crucial for a successful outcome.
Planning Your Design
Begin by sketching your ideas on paper or arranging sea glass pieces directly on the surface to visualize the final look. This process helps you decide on the layout and color arrangement.
Layout Considerations
When planning your layout, consider whether you prefer a random arrangement of sea glass for a natural look or a more structured design with patterns. A random arrangement can create a beautiful, organic appearance reminiscent of the beach, while a structured design allows you to form specific images or patterns with your glass pieces.
Color Arrangement Tips
Color arrangement is crucial for the visual impact of your mosaic. You can opt for a gradient effect, create distinct color blocks, or mix colors throughout for a more eclectic look. The choice depends on your personal preference and the overall aesthetic you wish to achieve for your table.
Step-by-Step Application Process
The application process involves several key steps that, when followed carefully, ensure a professional-looking result. Start by applying adhesive to a small section of your base.
Applying Adhesive
Work in limited areas, about one square foot at a time, to prevent the adhesive from drying before you can place your sea glass pieces. Apply the adhesive evenly with a trowel, creating a surface ready for your glass pieces.
Placing Sea Glass Pieces
Press sea glass pieces firmly into the adhesive, maintaining small, consistent gaps between pieces for the grout. Ensure the smoothest side of each piece faces up and vary the angles to catch and reflect light.
Working in Sections
Continue working in sections until the entire surface is covered. This approach allows you to focus on details and make adjustments as needed. Periodically step back to assess your progress and ensure your design is developing as planned.
Drying and Setting Time
After completing the application process, allow the adhesive to dry completely. This step is critical and typically requires time, often overnight or up to 24 hours, before you can proceed to grouting. Premature grouting can dislodge pieces and ruin your design.
By following these steps and allowing sufficient time for the adhesive to set, you’ll be well on your way to creating a beautiful sea glass mosaic that enhances your home decor.
Grouting and Finishing Your Mosaic
Completing your sea glass mosaic project involves two critical phases: grouting the spaces between the glass pieces and applying a finish to protect your work. These final steps are crucial in bringing out the beauty of your sea glass mosaic and ensuring its durability.
Selecting the Right Grout
Choosing the appropriate grout is vital for your sea glass mosaic. Non-sanded grout is ideal for projects with small gaps between pieces, while sanded grout is better suited for wider spaces and provides more durability for tabletops that will see regular use. The color of the grout can also dramatically affect the final appearance of your mosaic.
For instance, white or light-colored grout highlights the sea glass pieces and creates a bright, airy look. In contrast, darker grout provides contrast and can make the colors of the sea glass appear more vibrant.
| Grout Type | Ideal Use | Aesthetic Effect |
|---|---|---|
| Non-sanded Grout | Small gaps between sea glass pieces | Smooth finish, less visible grout lines |
| Sanded Grout | Wider spaces, durable surfaces like tabletops | More textured finish, grout lines more visible |
Applying Grout Between Sea Glass Pieces
Before applying grout, ensure all sea glass pieces are firmly set in the adhesive and the adhesive is completely dry. Using a grout float or gloved hands, press grout into the spaces between glass pieces, ensuring all gaps are filled.

Cleaning Excess Grout
After the grout begins to set (about 20-30 minutes), use a damp sponge to gently wipe away excess from the glass surfaces. Multiple passes with a clean, damp sponge will be necessary to remove all grout residue.
Sealing Your Finished Project
After the grout has cured for 24-48 hours, apply a high-quality sealant to protect your project from moisture and staining. The sealing process typically requires multiple thin coats rather than one thick application.
By following these steps and choosing the right materials, you’ll be able to complete your sea glass mosaic project with a professional finish that will last for years to come.
Creative Design Ideas and Inspiration
Unleash your creativity with sea glass mosaic designs that capture the essence of the ocean. The versatility of sea glass allows you to create a wide range of designs, from calming ocean wave patterns to intricate nautical themes.
Ocean Wave Patterns
Ocean wave patterns are a popular choice for sea glass mosaics, using varying shades of blue and green glass arranged in flowing curves to mimic the movement of the ocean. You can create a gradient effect from deep blues to light aquas, simulating the varying depths of the sea, and add white or clear pieces to represent sea foam or sunlight on water.
Geometric and Abstract Designs
For a more contemporary look, consider geometric and abstract designs. Arrange sea glass pieces in concentric circles, spirals, or angular patterns to create a modern aesthetic that still honors the natural beauty of the glass. This approach allows you to experiment with different colors and design elements.
Nautical Themes and Motifs
Nautical themes incorporate recognizable motifs like anchors, starfish, or sailboats into your mosaic design. These can be outlined in one color of sea glass and filled in with contrasting colors for a striking effect, adding depth and visual interest to your piece.
Color Schemes That Work Best
When planning your color scheme, consider the emotional impact of different color combinations. Blues and greens create a serene, calming effect reminiscent of the ocean. Adding amber and brown tones can evoke the feeling of sandy beaches, while incorporating rare colors like red or purple can create focal points. A monochromatic design using variations of a single color family can also be surprisingly sophisticated.
By considering the placement of your finished piece and drawing inspiration from nature, you can create a sea glass mosaic that is both beautiful and meaningful.
Conclusion
The process of creating a sea glass mosaic is not just about crafting a decorative piece; it’s about bringing a part of the sea into your home. As you complete your mosaic table or tray, you’ll have a beautiful and functional item that reflects your creativity.
Your finished sea glass project will be a unique addition to your home decor, capturing the tranquility of the ocean. The skills you’ve learned can be applied to other mosaic projects, allowing you to continue exploring your creativity. With proper care, your table or tray will remain beautiful for years to come.
By investing time in your sea glass mosaic, you’ve created a one-of-a-kind piece that brings the serene beauty of sea-tumbled glass into your everyday environment. We hope this guide has inspired you to explore more mosaic art possibilities.