Creating stunning designs on non-porous materials starts with understanding your options. Glass surfaces demand specialized paints that bond securely while maintaining vibrant colors. Whether you’re crafting decorative vases or personalized drinkware, the right choice impacts both aesthetics and longevity.
Five main categories work best for painting glass: acrylic enamel, solvent-based formulas, and markers designed for slick surfaces. Some acrylics require mixing with adhesion-boosting mediums, while others come ready-to-use. Key factors to consider include opacity levels, curing methods, and exposure to moisture or outdoor conditions.
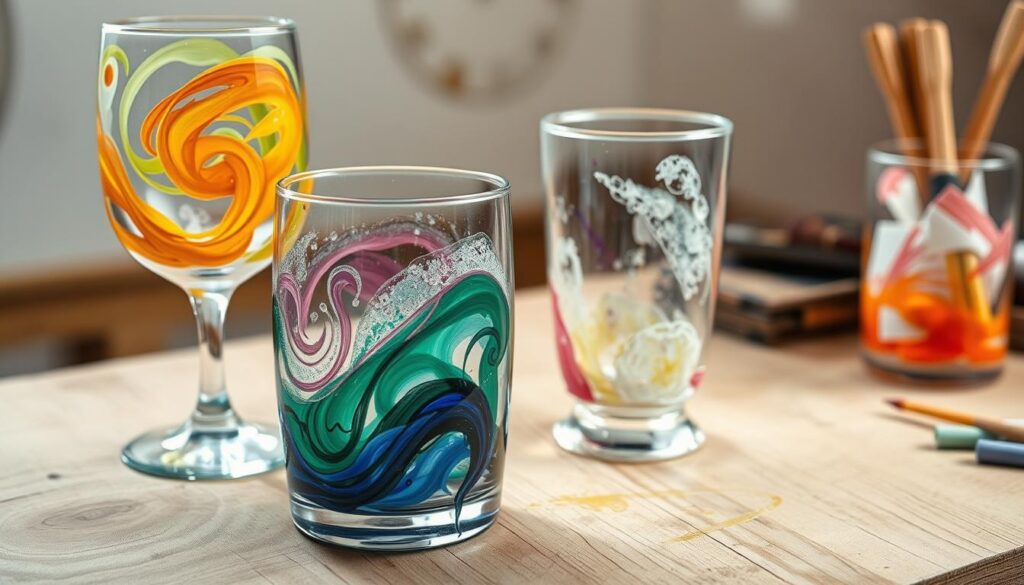
Opaque finishes hide imperfections and create bold statements, whereas transparent varieties mimic stained-glass effects. Functional items like tumblers need dishwasher-safe formulas, unlike display pieces. Beginners often prefer water-based options for easy cleanup, while experienced artists might opt for glossy solvent blends.
Your project’s purpose dictates everything. Heat-resistant types suit candle holders, while food-safe coatings are essential for kitchenware. Always test colors on scrap glass first – some hues shift during drying. Quality supplies prevent peeling and fading, ensuring your artwork stays vivid for years.
Introduction: The Appeal of Glass Painting
Transforming transparent surfaces into vibrant artworks unlocks endless creative potential. Glass painting lets you reimagine everyday objects while developing skills even beginners can master. A mason jar becomes a floral centerpiece, while plain drinkware turns into personalized gifts with sentimental value.
Discovering Creativity on Glass
Your artistic vision thrives on this smooth, reflective canvas. Specialized paints create effects from bold opaque designs to delicate stained-glass patterns. Experiment with metallic finishes or layer translucent colors for depth. Brushes, sponges, or markers offer different textures – perfect for geometric patterns or freehand florals.
Benefits of DIY Glass Projects
This craft blends practicality with self-expression. Upcycle thrifted vases or refresh old windowpanes without expensive tools. Water-based formulas simplify cleanup, while heat-resistant paint options adapt to candle holders or ovenware. Finished pieces withstand daily use when sealed properly, merging artistry with function.
Whether creating seasonal decor or custom tableware, glass transforms through color and technique. Each project builds confidence, inviting exploration of new styles and applications. Start small – even basic supplies yield impressive results on this versatile surface.
Understanding the Basics of Glass Painting
Mastering glass artistry begins with knowing your materials. Unlike standard craft paints, formulas designed for slick surfaces bond securely without peeling. This foundation ensures your designs stay vibrant through washes and handling.

Key Varieties for Different Needs
Acrylic-based formulas dominate glass projects due to their versatility. These paints mix with adhesion promoters for better grip on non-porous surfaces. Transparent options mimic stained glass, while opaque versions cover imperfections.
Enamel blends offer durable finishes that withstand frequent use. They combine acrylic’s ease with oil-based toughness, ideal for functional items like coasters. Solvent-based types deliver intense color saturation but require proper ventilation during application.
| Paint Type | Best For | Finish | Drying Time |
|---|---|---|---|
| Acrylic Glass | Decorative pieces | Transparent/Matte | 24 hours |
| Enamel | Functional items | Glossy | 48 hours |
| Solvent-Based | Outdoor decor | High-Shine | 72 hours |
| Markers | Detailed work | Varied | 2-4 hours |
Markers simplify intricate patterns and lettering. Their fine tips create crisp lines, perfect for beginners tackling mandalas or geometric shapes. Consider opacity levels when layering colors – some formulas become translucent when dry.
Water-based options clean up easily but may need sealants. For permanent results, heat-cured paints fuse with the glass surface. Always test new colors on scrap materials to preview final results.
Choosing the Right Paint for Glass
Selecting the ideal medium for glass artistry requires balancing aesthetics and practicality. Different formulas behave uniquely on slick surfaces, affecting durability, appearance, and maintenance. Let’s break down popular options to help you make informed creative decisions.
Exploring Acrylic Paints vs. Enamel Paints
Acrylic paint shines in projects needing light transmission. Its translucent quality mimics classic stained-glass effects when layered. These water-based formulas dry flexible, resisting cracks from temperature shifts. However, they require sealants for functional items like drinkware.
Enamel paint delivers bold, opaque coverage in single coats. The oil-based formula cures to a glass-like hardness, perfect for coasters or vases. Though durable, some white enamels develop yellow tints after years of UV exposure. Always check labels for dishwasher-safe certifications.
Solvent-Based and Specialty Options
Professional artists often favor solvent-based blends for intense color saturation. These create museum-quality finishes but demand ventilated workspaces. Specialty options include frost-effect sprays for privacy windows and heat-resistant types for candle holders.
| Type | Transparency | Cure Time | Best Use |
|---|---|---|---|
| Acrylic | High | 24h | Decorative panels |
| Enamel | Low | 48h | Functional items |
| Solvent | Medium | 72h | Art installations |
Test new formulas on spare glass before committing. Textured surfaces might need thicker applications, while smooth planes work with any type. Always prioritize safety with solvent-based products – keep windows open and wear gloves.
Preparing Your Glass Surface for Painting
Great artwork starts with flawless groundwork. Proper preparation turns slick glass into a receptive canvas, preventing peeling and uneven textures. Skipping this step risks ruined designs, even with premium paints.
Cleaning and Priming Techniques
Wash your item in warm soapy water to eliminate grease and fingerprints. Rinse thoroughly, then wipe with rubbing alcohol using lint-free cloths. This removes invisible residues that sabotage adhesion.
Let the surface air-dry completely – about 15 minutes. Moisture causes bubbling when you apply paint. For extra grip, use alcohol-based primer. Brush it quickly in thin layers before it dries tacky.
Ensuring Proper Drying and Adhesion
Test primer on scrap glass first. Some formulas need 30 minutes to cure. Avoid touching cleaned areas – skin oils repel paint.
Stubborn surfaces benefit from acrylic spray sealers. These create micro-textures for better bonding. Wait 24 hours before painting heat-resistant items like candle holders.
Remember: preparation determines longevity. A well-prepped surface keeps colors vibrant through washes and sunlight. Invest time here, and your painting glass projects will shine for years.
Selecting Tools and Techniques for a Professional Finish
Professional results on glass depend equally on skill and tool selection. The right applicators transform ordinary surfaces into polished masterpieces, while technique determines durability and visual impact.

Brushes, Sponges, and Paint Markers
Soft synthetic brushes outperform stiff alternatives by minimizing visible strokes. Flat varieties spread base coats smoothly, while angled tips handle edges. For detailed work, size 00-2 rounds create crisp lines.
Spouncers (sponge-tipped tools) distribute paint evenly across curved surfaces. Pair them with translucent formulas for gradient effects. Daubers make perfect dots – press straight down and lift vertically for clean shapes.
| Tool | Best Use | Effect | Maintenance Tip |
|---|---|---|---|
| Synthetic Brushes | Base coats/details | Smooth finish | Clean with mild soap |
| Spouncers | Large areas | Textured layers | Replace worn sponges |
| Paint Markers | Lettering | Precise lines | Store horizontally |
| Stylus | Dot patterns | Uniform dots | Wipe tip after use |
Creative Applications with Stencils and Tape
Frog tape creates sharp geometric borders when pressed firmly onto dry glass. Remove it before paint fully cures to prevent chipping. Layered stencils build depth – let each color dry completely between applications.
Cotton swabs fix errors without damaging underlying layers. For metallic accents, dip toothpicks into specialty paints for controlled detailing. Always work in thin layers – thick applications crack during curing.
Essential Supplies and Project Planning
Successful glass artistry hinges on preparation and premium materials. Gather your acrylic paint, brushes, and cleaning supplies before starting. This prevents mid-project interruptions and ensures smooth workflow.
Gathering High-Quality Materials
Top-tier products like FolkArt Enamel sets offer self-sealing formulas – no extra prep needed. Their water-based formula needs oven curing but resists scratches. For stained-glass effects, Plaid Gallery Glass dries semi-translucent with easy color identification.
Artistro markers simplify precision work. Their quick-drying ink suits beginners tackling intricate patterns. Remember: bake marked glassware before dishwashing.
Affordable practice items abound at Dollar Tree or thrift stores. Test techniques on these before decorating pricier pieces. Always keep rubbing alcohol nearby for quick fixes.
Match your paint choices to the project’s purpose. Outdoor decor demands UV-resistant formulas, while indoor displays prioritize vibrancy. Quality supplies transform ordinary glass into lasting masterpieces.