Have you ever wondered how to bring a touch of the beach into your home? Sea glass, with its smooth, weathered texture, is a perfect choice. This unique material is not only sustainable but also adds a coastal charm to any space.
Over time, pieces of glass are tumbled by the ocean, creating smooth, rounded fragments. These come in common colors like white, green, and brown, with rare finds in blue or red. This natural process makes each piece one-of-a-kind.
DIY projects using sea glass are growing in popularity. They allow you to create personalized art that reflects your style. Whether it’s for a beach house or a nautical-themed room, these pieces are versatile and timeless.
Explore more ways to incorporate this beautiful material into your home decor with our guide. It’s time to add a coastal touch to your space!
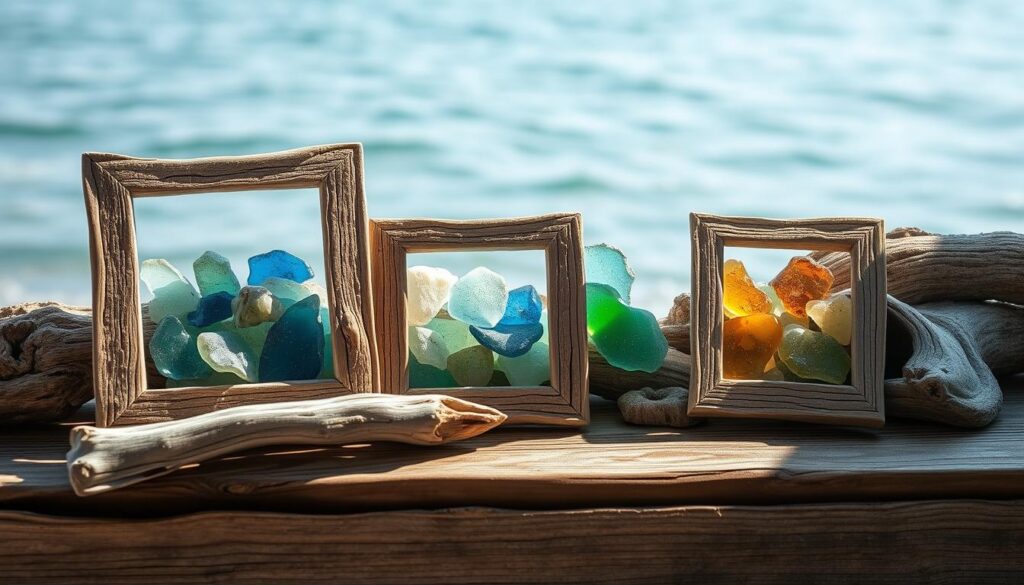
Introduction to Sea Glass Picture Frames
Discover the timeless beauty of ocean-tumbled treasures. These unique fragments, shaped by waves over 10 to 30 years, bring a touch of the shore into your home. With colors ranging from common white and green to rare blue and red, each piece tells its own story.
Historically, maritime communities used these smooth fragments for practical purposes. Today, they’ve become a staple in coastal interior design. From flowers to sailboats, popular designs reflect the natural world, making them perfect for adding character to any space.
Just like Wilson Bentley’s snowflakes, no two pieces are alike. This uniqueness has made sea glass art a favorite among DIY enthusiasts. Companies like EL & Company in Maryland have even turned custom creations into a thriving business.
You can start your own project using found beach treasures or ethically sourced supplies from craft stores. Whether you’re crafting a gift or enhancing your decor, diy sea glass projects are a rewarding way to connect with nature and express your creativity.
Materials Needed for Your Sea Glass Picture Frame
Ready to create something unique with ocean treasures? Gathering the right materials is the first step to bringing your vision to life. Here’s what you’ll need to get started.
Essential Materials
- Sea glass: Collect smooth, tumbled pieces in various colors. Verify their smoothness to avoid sharp edges.
- Frame: The Ikea Ribba frame is a great choice for its depth and versatility.
- Card stock: Use 8.5″x11″ card stock for standard frames, providing a sturdy base for your design.
- Wood glue: This adhesive is ideal for its strong hold and clear finish, ensuring your glass stays in place.

Optional Materials for Added Creativity
Enhance your project with additional elements for a personalized touch. Consider using matting for a polished look or markers to add details. Beachcombing finds like driftwood, pebbles, or twigs can also complement your design, adding a natural vibe.
With these materials, you’re all set to create a one-of-a-kind craft that reflects your style. Let your creativity flow and enjoy the process!
Step-by-Step Guide to Creating Your Sea Glass Picture Frame
Ready to dive into a creative project that brings the beach to your home? Follow these simple steps to create sea glass art that’s both beautiful and meaningful. With a little patience and creativity, you’ll have a stunning piece to display in no time.
Step 1: Gather Your Materials
Start by collecting all the essentials for your diy sea glass project. You’ll need smooth pieces of glass, a sturdy frame, and card stock for the base. Don’t forget wood glue to secure your design. Double-check your materials to ensure everything is ready before you begin.
Step 2: Arrange Your Sea Glass
Lay out your pieces on the card stock to plan your design. Consider focal points or symmetrical layouts for a balanced look. Experiment with different arrangements until you find one that feels just right. This step is all about letting your creativity shine.
Step 3: Attach the Sea Glass to Paper
Once your design is set, carefully glue each piece to the card stock. Use a thin layer of wood glue to prevent warping. Allow 2-3 hours for the glue to dry completely. This ensures your artwork stays securely in place.
Step 4: Display Your Sea Glass Art in a Frame
Finally, place your completed design into the frame. For a polished look, consider using double matting to enhance the artwork. Display your creation in a humidity-controlled environment to preserve its beauty for years to come.
With these steps, you’ve created a unique piece that adds a coastal touch to your home. Enjoy the process and the stunning results of your project!
Design Ideas for Sea Glass Picture Frames
Transform your space with stunning design ideas that blend natural beauty and creativity. Whether you’re aiming for a beach-inspired look or a unique piece of wall decor, these concepts will inspire you to craft something truly special.
Incorporating Natural Elements
One of the most popular design trends is combining ocean treasures with other natural materials. For example, the Mermaid’s Catch frame pairs smooth fragments with shells and netting for a coastal vibe. Seasonal variations, like Vermont snowflake ornaments, add a unique touch to your decor.
- Use complementary colors to create harmony in your piece.
- Experiment with layered fragments for a 3D effect.
- Integrate beachcombing finds like driftwood or pebbles for added texture.
For special occasions, consider a wedding display frame that incorporates a bridal bouquet theme. Holiday-specific designs, using red and green combinations, also make for festive wall decor.
These ideas not only celebrate the beauty of the beach but also allow you to create personalized pieces that reflect your style. Let your imagination guide you as you explore these design possibilities.
Tips for Customizing Your Sea Glass Picture Frame
Personalizing your project can make it truly one-of-a-kind. Whether you’re crafting a gift or enhancing your home decor, these tips will help you add a unique touch to your creation. From choosing the right frame to mastering distressing techniques, here’s how to make your work stand out.

Choosing the Right Frame
The frame you select can significantly impact the overall look of your project. For a shabby-chic finish, consider distressing techniques using chalk paints. A blend of fuchsia and buttermilk, for example, can create a soft, vintage vibe. This method works well for both consignment and Etsy sales strategies.
Custom staining is another great option. Coastal gray tones can add a modern yet timeless feel to your piece. When selecting a frame, think about the wall space where it will be displayed. Size optimization ensures your artwork fits perfectly without overwhelming the area.
Professional Presentation and Pricing
If you’re showcasing your work at art fairs, professional presentation is key. Use double matting to enhance the color and texture of your design. Pricing your piece can be tricky, but market data from EL & Company suggests starting with a base price and adjusting based on complexity and materials.
By following these tips, you’ll create a piece that not only reflects your style but also resonates with others. Whether you’re selling or gifting, these customization ideas will add a personal touch to your work.
Conclusion
Bringing a piece of the shore into your home has never been easier. With sea glass art, you can create unique pieces that reflect your style and add a coastal touch to your home decor. Whether you’re crafting a family tradition piece or collaborating with artisans on platforms like Etsy, the possibilities are endless.
Consider joining local beach cleanups to find materials for your next project. It’s a great way to give back while gathering inspiration. Maryland craft stores are also hosting upcoming workshops, perfect for beginners and seasoned creators alike.
Don’t forget to share your creations on social media. Your glass art could inspire others to start their own journey. Let’s celebrate the beauty of the shore and create sea-inspired pieces that bring joy to your space.