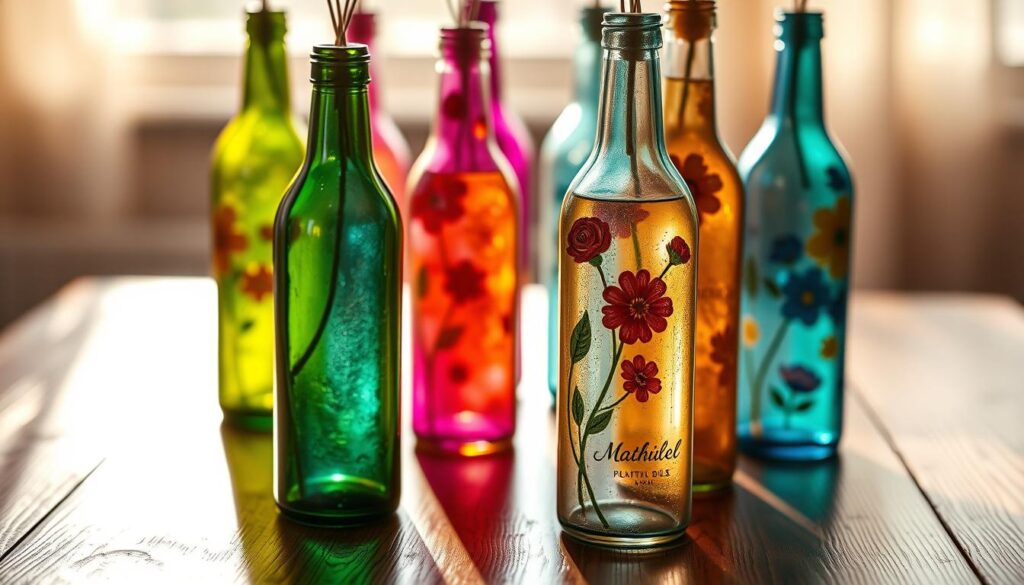
Upcycling glass bottles is a growing trend that combines creativity with sustainability. By transforming these items, you can reduce waste while creating something unique and functional. This project is perfect for anyone looking to add a personal touch to their home or daily life.
For example, many people reuse old water bottles, adding partial decoupage to maintain visibility while enhancing their appearance. This approach not only looks great but also aligns with the “recycle-reuse-reduce” principle.
In this guide, you’ll learn how to use glass paint and decoupage techniques to create stunning pieces. Whether you’re working with water bottles or wine bottles, the possibilities are endless. Let’s get started on this fun and eco-friendly journey!
Introduction to Decorating Glass Bottles
Transforming everyday items into unique pieces is a rewarding way to express creativity. Glass bottles are perfect for DIY projects because of their non-porous surface, durability, and wide availability. Whether you’re a beginner or an experienced crafter, this project offers endless possibilities.
Before diving in, it’s important to prepare the surface properly. Using products like Polyvine Multi Surface Lacquer ensures better adhesion for paint and other materials. This step is crucial for achieving a professional finish.
One common concern is maintaining functionality, especially for items like water bottles. Partial decoration, such as painting only half the bottle, keeps it usable while adding a personal touch. This approach balances aesthetics and practicality.
Here are some key techniques to explore:
- Crackle effects: Add texture and vintage charm to your design.
- Rice paper application: Create intricate patterns with ease.
- Sealing methods: Protect your work with a durable finish.
You might already own basic tools like brushes and sponges, but specialty items like Mod Podge and crackle medium can elevate your results. For more ideas, check out this tutorial on simple decoupage techniques.
This project also supports sustainability by repurposing bottles instead of discarding them. Optional enhancements, such as twine wrapping or clay embellishments, can add extra flair. Just remember to account for drying intervals, especially when working with crackle effects or varnish.
Materials You’ll Need for the Project
Gathering the right materials is the first step to creating a stunning DIY project. Whether you’re a beginner or an experienced crafter, having the right tools ensures a smooth and enjoyable process. Below, we’ve broken down the essentials and optional items to help you get started.

Essential Supplies
To achieve professional results, you’ll need a few key items. Start with clean bottles—remove labels using warm soapy water or vinegar for a smooth surface. Next, choose a high-quality chalk paint like Country Chic or Dixie Belle for the base coat. These brands provide excellent coverage and durability.
For adhesion, use a reliable decoupage medium such as Mod Podge or Polyvine Varnish. These products ensure your designs stay in place. Decoration materials like rice paper or themed napkins add unique patterns and textures. Finally, gather basic tools like sponge daubers, liner brushes, and soft-bristle brushes for precise application.
Optional Supplies
If you want to take your project to the next level, consider adding optional materials. Little Birdie’s One Step crackle medium creates a vintage, textured look. Twine or air-dry clay can be used for embellishments, adding a personal touch. A clear varnish like Polyvine Decorators Varnish provides a durable finish, protecting your design from wear and tear.
These optional items allow you to experiment with different styles and techniques. Whether you’re aiming for a rustic or modern look, the right supplies make all the difference.
Step-by-Step Guide to Decorating Glass Bottles
Turn ordinary objects into artistic masterpieces with simple techniques. This guide walks you through each step, ensuring your project is both fun and successful. Let’s dive into the process and create something unique.
Step 1: Prepare the Bottle
Start by cleaning the surface thoroughly. Use alcohol wipes to remove any oils or residues. This ensures the paint adheres properly. If you’re using chalk paint, apply a layer of Polyvine Lacquer to dull the shine. This step is crucial for a professional finish.
Step 2: Apply the Base Coat
Choose a high-quality chalk paint for the base coat. Apply it evenly using a soft brush or sponge. Allow the first layer to dry completely before adding a second coat. This creates a smooth and durable surface for your design.
Step 3: Decoupage the Bottle
Cut your rice paper or napkins to the desired size. Use water to smooth the edges for a seamless look. Apply a decoupage medium like Mod Podge to the surface. Carefully place the paper and smooth out any bubbles. Let it dry before moving to the next step.
Step 4: Add Embellishments
Enhance your design with optional embellishments. Use twine, air-dry clay, or crackle medium for added texture. These details make your project stand out. Allow time for each element to dry before proceeding.
Step 5: Seal the Design
Protect your work with a clear varnish. Apply multiple coats for durability, especially if the bottle will hold water. This prevents peeling and ensures your design lasts. Let the final layer dry completely before use.
| Step | Key Tips |
|---|---|
| Prepare | Clean with alcohol wipes for better adhesion. |
| Base Coat | Use chalk paint for a smooth finish. |
| Decoupage | Water-cut edges for a seamless look. |
| Embellishments | Add texture with crackle medium or twine. |
| Seal | Apply multiple varnish coats for durability. |
Conclusion
Crafting functional art from everyday items is a creative and sustainable way to express yourself. This project transforms simple objects into unique pieces that add charm to your space. Try experimenting with ombre paint blends or themed designs for gifts.
We’d love to see your creations! Share your ideas online and tag our blog for a chance to be featured. For more inspiration, check out our video tutorials or explore affiliate-linked products in our cart.
Each decorated item reduces waste, making this a meaningful and eco-friendly activity. Show us your crackle effects or clay embellishments in the comments—let’s inspire each other!