Transform broken pieces into something beautiful with this creative project. Upcycling materials not only reduces waste but also adds a personal touch to your outdoor space. Whether you’re a beginner or an experienced crafter, this idea offers endless design possibilities.
Functional and decorative, these handmade pieces blend artistry with practicality. They serve as eye-catching accents while guiding visitors through your landscape. The best part? You don’t need expensive supplies—just leftover materials and a little creativity.
Safety comes first when working with sharp edges. Always wear protective gloves and handle pieces carefully. With proper precautions, you can craft stunning stepping stones that reflect your unique style.
This budget-friendly project fits current trends in personalized outdoor décor. Set aside a weekend, gather your supplies, and let your imagination run wild. The results will enhance your space for years to come.
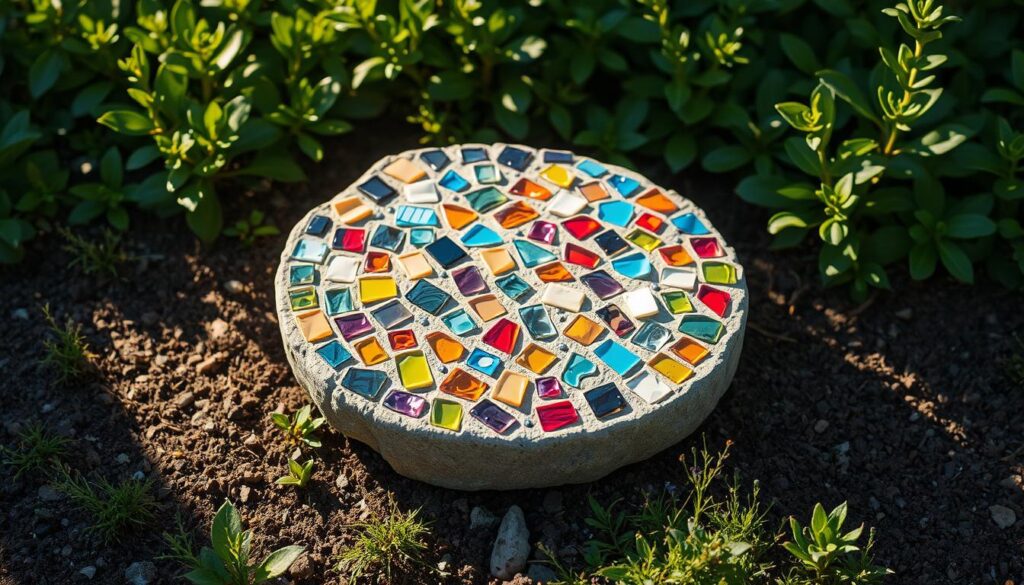
Introduction to DIY Mosaic Garden Stones
Crafting decorative stepping pieces connects you to centuries of artistic tradition. Ancient cultures used fragmented tiles to create stunning pathways, blending art with utility. Today, this timeless technique lets you add personality to your outdoor space.
Why choose this project? Unlike store-bought décor, handmade creations reflect your style. They’re also cost-effective—leftover materials like sea glass or ceramic shards work perfectly. For inspiration, explore sea glass stepping stones designs.
Benefits Beyond Beauty
Creating these pieces offers therapeutic rewards. The rhythmic process of arranging fragments reduces stress. Plus, the finished stones withstand weather, lasting years with minimal upkeep.
| Feature | Mosaic Stones | Other Garden Art |
|---|---|---|
| Durability | High (glass/concrete bond) | Varies (wood/metal may degrade) |
| Customization | Endless patterns/colors | Limited by pre-made designs |
| Cost | Low (upcycled materials) | Higher for premium pieces |
Social media trends highlight their popularity. Pinterest boards overflow with abstract and themed ideas. Even beginners can achieve professional results—just start simple and experiment!
Misconceptions? Some worry about complexity. But with basic tools and patience, you’ll craft functional art that enhances your landscape in a unique way.
Materials and Tools You’ll Need
Quality tools ensure your project lasts through seasons while keeping costs low. Whether repurposing old materials or buying new, focus on durability and safety. Below, we break down essentials and creative extras to personalize your work.
Essential Supplies
Versabond Professional Thinset Mortar is ideal for adhesion. Use 2 lbs per 12″ stone. Polymer-modified mortars resist cracking better than regular concrete. Store unused portions in airtight containers.
Safety gear includes cut-resistant gloves and goggles. For glass, nippers like Toyo TC-10B help shape fragments. A marble file smooths sharp edges. Keep a damp sponge handy for cleanup.
Optional Add-Ons for Creativity
Alternative molds like cake pans or plastic trays offer unique shapes. Upcycle old jewelry or keys for texture. Avoid tempered glass—it shatters unpredictably.
Pea gravel strengthens the base. For intricate designs, try WissMozzer glass cutters. Work in temperatures above 50°F for proper mortar curing.
Safety First: Handling Scrap Glass and Mortar
Safety precautions make crafting enjoyable and injury-free. While creativity drives your project, proper handling of materials ensures smooth progress. Focus on protective measures and tool techniques to avoid mishaps.
Protective Gear to Wear
Always wear cut-resistant gloves when handling fragments. Pair them with ANSI-approved safety glasses to shield your eyes from flying shards. For mortar mixing, a NIOSH-rated dust mask prevents inhalation of fine particles.
Work in a ventilated area to disperse chemical fumes. Keep a first-aid kit nearby for minor cuts—clean wounds immediately and apply pressure if bleeding occurs. Supervise children closely if they assist.
How to Smooth Sharp Glass Edges
Use a mosaic glass cutter to trim uneven pieces. For final polishing, rub edges with emery cloth under running water (wet method reduces dust). Dry grinding works but requires extra caution.
Allow 24–48 hours for mortar to cure fully. High humidity or temperatures below 50°F may extend drying time. Store tools safely after each use to maintain their condition.
Designing Your Mosaic Pattern
Planning your design transforms random fragments into cohesive art. Start by sketching ideas on paper or using apps like Procreate to project layouts onto your base. This avoids carbon paper smudges on textured surfaces.

Choosing the Right Glass Pieces
Think like a jigsaw puzzle—sort scraps by colors and shape. Irregular edges add texture, while uniform cuts suit geometric patterns. For outdoor use, prioritize UV-resistant hues like cobalt or amber.
Apply color theory: Pair warm tones (reds/yellows) with cool (blues/greens) for contrast. A 3:1 ratio balances bold and neutral shades. Test combinations under natural light before setting.
Abstract vs. Themed Designs
Abstract designs thrive on spontaneity. Arrange pieces freely, leaving gaps for grout lines. For themes (zodiac, botanical), outline key elements first. Scale matters—larger motifs work best for walkways.
Popular Etsy trends include:
- Mandala patterns with radial symmetry
- Leaf imprints using green sea glass
- Celestial themes with mirrored accents
For complex layouts, divide the base into a 1-inch grid. This ensures proportional spacing. If pieces don’t fit, tweak the design or trim edges slightly.
Preparing the Mold or Base Surface
A well-prepared base ensures your artwork lasts for years. The right surface prevents sticking and uneven textures. Start by selecting a mold—silicone offers flexibility, while plastic is rigid and reusable.
Using Petroleum Jelly or Contact Paper
Apply a thin layer of petroleum jelly (1/16″ thick) for easy release. In cold weather, warm it slightly for smoother spreading. Alternatively, contact paper provides a non-stick barrier without residue.
| Feature | Petroleum Jelly | Contact Paper |
|---|---|---|
| Ease of Use | Best for curved surfaces | Ideal for flat bases |
| Cleanup | Requires wiping | Peels off cleanly |
| Cost | Low ($2–$5 per jar) | Moderate ($5–$10 per roll) |
Spacing and Layout Tips
Presoak materials for 20 minutes to improve adhesion. Maintain 1/4″ gaps between pieces for grout. Use a depth gauge to embed fragments 1/3 of their thickness.
Common mistakes to avoid:
- Overfilling molds—leave 1/2″ border space.
- Ignoring humidity—high moisture slows curing.
- Skipping release agents—risks damaging your stepping piece.
Step-by-Step Guide to DIY Mosaic Garden Stones Using Scrap Glass
Follow these steps to craft durable and artistic pathway accents. Precision matters—each phase ensures your creation withstands weather and wear. Work in a shaded area to control drying times.
Step 1: Mixing and Applying Mortar
Combine mortar and water in a 4:1 ratio (4 parts powder to 1 part water). Stir clockwise for 2 minutes until peanut butter-thick. Test consistency: A ribbon should hold shape for 5 seconds when drizzled.
Avoid overmixing to prevent air bubbles. Spread a small amount (1/2″ layer) into molds. Work in sections if temperatures exceed 80°F—mortar sets faster in heat.
Step 2: Arranging the Glass Pieces
Press pieces at a 15° angle for better adhesion. Space them 1/4″ apart using toothpicks as guides. For intricate designs, start from the center outward.
| Placement Method | Pros | Cons |
|---|---|---|
| Hand-Pressing | More control over depth | Risk of fingerprints |
| Tool Placement | Cleaner edges | Less tactile feedback |
Step 3: Adding Strength with Pea Gravel (Optional)
Mix pea gravel (3/8″ size) into remaining mortar (1:1 ratio) for a reinforced base. Tamp gently to remove air pockets. Cure for 48 hours before demolding.
For colder climates, cover with plastic to slow drying. Never handle set mortar—it weakens the bond. Your finished piece will gain full strength in 7 days.
Curing and Cleaning Your Stone
Proper curing ensures your artwork stands the test of time. Rushing this phase risks cracks or weak adhesion. Follow these steps for a flawless finish.
Drying Time and Conditions
Allow 3–4 days for full curing. Indoor drying offers controlled humidity—cover with plastic to slow moisture loss. Outdoors, shield from rain and direct sun.
Cold weather extends curing time. Below 50°F? Add 24 hours per day. Test readiness by pressing lightly—no indentation means it’s set.
Removing Excess Mortar
Use a damp sponge for initial cleanup. Wipe diagonally to avoid dislodging pieces. For stubborn residue, a dental tool scrapes gently without scratching the surface.
Prevent efflorescence (white haze) by sealing with a breathable acrylic. Avoid vinegar or ammonia—they degrade mortar. Store unused materials in airtight containers.
- Pro tip: Label curing dates with masking tape.
- Repair chips within 48 hours for seamless fixes.
Applying Grout for a Polished Look
The final touch that elevates your project from craft to masterpiece lies in the grouting process. Proper application locks fragments in place while enhancing visual appeal. Follow these techniques to ensure longevity and a flawless finish.
Choosing Grout Colors
Align grout hues with your overall design vision. Neutral tones (beige, gray) highlight colorful glass, while bold shades create contrast. For outdoor stepping pieces, opt for stain-resistant, silicone-based formulas.
| Type | Best For | Curing Time |
|---|---|---|
| Sanded | Gaps >1/8″ (adds texture) | 24–48 hours |
| Unsanded | Gaps | 12–24 hours |
Custom mixes? Combine pigments with clear grout for unique effects. Test samples on spare tiles first. Avoid dark colors in sunny areas—they absorb heat and may crack.
Sponge Cleaning Techniques
Wring the sponge thoroughly to avoid over-wetting. Wipe diagonally across joints to prevent grout removal. Rinse frequently in clean water—cloudy residue causes haze.
- Pro tip: Use a margin float at 45° to press grout deeply into gaps.
- Remove haze within 2 hours using a microfiber cloth.
- Seal after 72 hours for maximum protection.
Common mistakes include rushing sponge passes or skipping the sealant. Patience here ensures your stone stays vibrant for decades.
Troubleshooting Common Issues
Even the most carefully crafted projects can encounter minor setbacks. Whether it’s a chipped corner or a loose fragment, quick fixes restore both function and beauty. Below, we outline solutions for frequent challenges.
Fixing Chipped Corners
Epoxy putty works best for small cracks. Knead equal parts resin and hardener, then press into gaps. Smooth with a damp finger for seamless edges. For color matching, mix acrylic paint into the adhesive before applying.
Hairline cracks? Use a syringe to inject thin-set mortar. Wipe excess immediately with a sponge. Freeze-thaw damage? Apply a breathable sealant annually to prevent moisture expansion.
Securing Loose Glass Pieces
Remove debris from the gap with a toothbrush. Apply a dab of adhesive—epoxy for permanence or acrylic for flexibility. Press the piece firmly and hold for 30 seconds. Support with masking tape until cured.
| Adhesive Type | Best For | Curing Time |
|---|---|---|
| Epoxy | High-traffic areas | 24 hours |
| Acrylic | Indoor/temporary fixes | 2–4 hours |
Pro tip: Test adhesives on scrap materials first. For efflorescence (white powder), scrub with a nylon brush and vinegar solution. Rinse thoroughly to avoid residue.
Creative Ideas for Your Garden Stones
Bring your outdoor space to life with unique, nature-inspired accents. Whether you prefer rustic textures or vibrant themes, these ideas add personality to your landscape. Let’s explore ways to blend artistry with functionality.
Incorporating Natural Elements
Flagstone textures mimic rugged terrain, perfect for a woodland aesthetic. Press lichen or moss into wet mortar for organic patterns. These age beautifully, blending seamlessly with your garden.
Herb-embedded stones serve dual purposes. Thyme or chamomile release fragrance when stepped on. Use non-toxic adhesives to secure dried botanicals. This creates sensory pathways safe for pets and wildlife.
| Natural Element | Application Tip | Longevity |
|---|---|---|
| Lichen | Apply to partially cured mortar | 2–3 years |
| Herbs | Seal with acrylic spray | 1 season (replaceable) |
Themed Stones for Seasonal Decor
Moon phase designs glow under solar lights. Embed LED strips along crescent shapes for night visibility. Use dark grout to accentuate the contrast.
Seasonal themes refresh your space effortlessly. Try these popular designs:
- Spring: Pastel floral mosaics
- Summer: Nautical motifs with sea glass
- Fall: Leaf imprints in copper tones
- Winter: Frosted glass snowflakes
Memorial stones honor loved ones or pets. Engrave names with a diamond-tip tool. Add their favorite colors or symbols for a personal touch.
Conclusion
Your finished stepping pieces blend artistry with lasting durability. Remember key safety steps: wear gloves and allow proper curing time. The pride of handmade art transforms your home in a meaningful way.
Ready for more? Scale up to larger pathways or wall accents. Annual sealing keeps your stone vibrant. Experiment with materials like ceramics or seashells for fresh textures.
Share your project online to inspire others. These eco-friendly creations also make heartfelt gifts. Now, go craft something extraordinary—one stepping piece at a time!