Wire wrapping is a versatile craft that allows you to design stunning decorations and jewelry. Whether you’re preparing for the holidays or looking for a creative project, this technique is perfect for making unique pieces. Seasonal decorations like Christmas tree ornaments can be personalized to match your style.
Professional designer Julie Bean shares her expertise in a video tutorial, demonstrating how to transform sea glass triangles into festive earrings. She highlights two wrapping styles: neat and messy, using 24g and 26g wire. These techniques are adaptable for all skill levels, making it easy for beginners to get started.
You’ll learn essential skills like forming a loop, spiral wrapping, and integrating beads. The finished pieces can double as ornaments or wearable art, such as earrings or pendants. For more inspiration, check out this easy wire wrapping guide.
This project is cost-effective, customizable, and beginner-friendly. With step-by-step guidance, you’ll master professional methods and explore creative variations like glitter accents or mixed-media elements. Let’s dive into the world of wire-wrapped designs and bring your ideas to life!
Introduction to Wire Wrapped Glass Ornaments
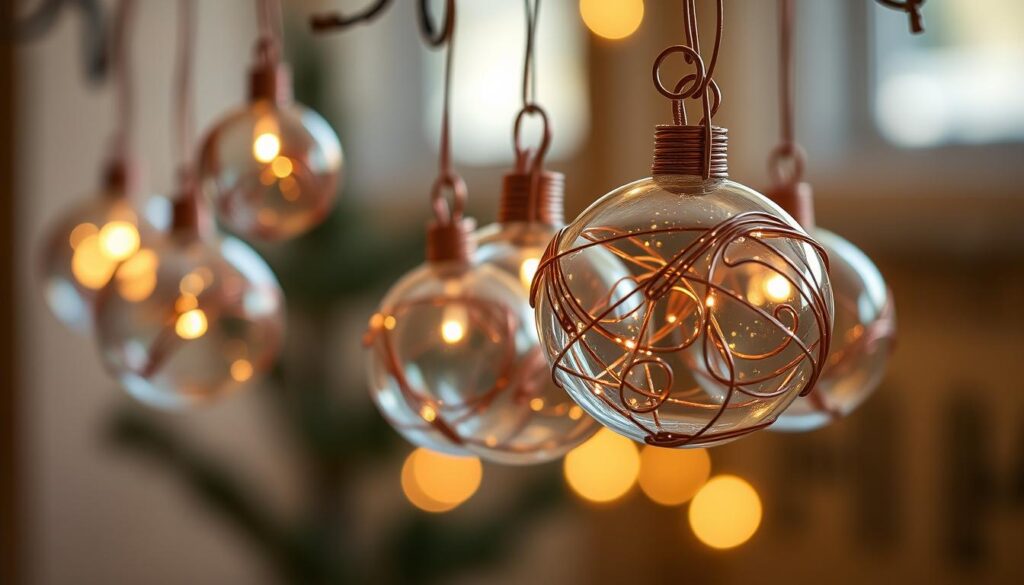
Transform your seasonal decor with wire-wrapped designs. This craft technique involves securing glass elements with decorative metal coils, creating stunning pieces that can adorn your Christmas tree or double as jewelry. Originally rooted in ancient jewelry-making, wire wrapping has evolved into a versatile method for holiday decorations.
Modern applications of wire wrapping go beyond tree ornaments. You can create window decor, gift toppers, or even wall-sized installations. The design flexibility allows for both abstract and literal shapes, such as a beaded Christmas tree. Whether you use sea glass or manufactured pieces, the results are equally captivating.
When choosing materials, consider aluminum wire for lightweight projects or gauge wire for durability. Beginners can start with basic techniques like forming a loop or adding beads for extra flair. For more advanced designs, explore professional wire wrapping methods.
Customization is key. Experiment with different bead types, wire colors, and hanging mechanisms to match your style. Whether for indoor or outdoor use, wire-wrapped designs are both durable and visually striking. Let your creativity shine this holiday season!
Materials Needed for Wire Wrapping
The key to successful wire wrapping lies in choosing the correct materials. Whether you’re making jewelry or decorative pieces, having the right tools and supplies ensures a smooth process. Let’s explore what you’ll need to get started.

Essential Tools and Supplies
To begin, you’ll need a few basic tools. Pliers are essential for gripping and shaping wire. Chain nose pliers are perfect for tight spaces, while round nose pliers help create smooth loops. For professional coils, consider wire looping pliers.
Wire cutters are another must-have. They ensure clean edges, which are crucial for a polished finish. A ruler or measuring tape helps maintain consistent sizing, especially for larger projects.
Optional supplies like GS Hypo cement can reinforce your designs, while a bead mat keeps your workspace organized. Julie Bean’s toolkit, featured in her tutorial, includes these items for professional results.
Choosing the Right Wire and Beads
Selecting the correct wire is vital. For detailed work, 24g or 26g gauge wire is ideal. If you’re working on structural elements, opt for 16g or 18g wire. This ensures durability without compromising flexibility.
Beads add a decorative touch to your designs. Crystal rondelles, seed beads, and glass pearls are popular choices. For a rustic look, consider painted wood beads. These options work well for both jewelry and craft projects.
With the right materials, you’re ready to create stunning wire-wrapped pieces. Whether you’re a beginner or an experienced crafter, these tools and supplies will help you achieve professional results.
Step-by-Step Guide to Creating Hanging Glass Ornaments
Crafting unique decorations starts with the right preparation and techniques. Whether you’re designing for a tree or creating wearable art, these steps will guide you through the process. Let’s dive into the details.
Preparing Your Materials
Start by selecting smooth, stable pieces for your project. Clean them thoroughly to ensure a polished finish. Position any holes or natural curves to optimize wrapping. A well-organized workspace is key—use a non-slip mat and keep your tools within reach.
Basic Techniques for Secure Designs
Begin with the base loop technique. Measure 1″ from the end wire and make 3-4 wraps using looping pliers. This creates a sturdy foundation. For spiral wrapping, press the wire against the piece while rotating it smoothly. This method ensures even coverage and a professional look.
Enhancing with Decorative Elements
Add flair by integrating beads into your design. Alternate coiling and stringing between wire arms for a balanced effect. Use gauge wire for durability and flexibility. Experiment with colors and textures to match your style.
For more advanced techniques, explore this guide on turning sea glass into wearable. With these steps, you’ll create stunning, personalized pieces that stand out.
Tips and Tricks for Perfect Wire Wrapped Ornaments
Mastering wire-wrapped designs requires attention to detail and creativity. Whether you’re decorating a tree or crafting wearable art, these tips will help you achieve professional results. Let’s explore how to ensure durability and add unique flair to your projects.

Ensuring Durability and Stability
To make your designs last, focus on reinforcement methods. Use glue backing or double-wrapped connection points for added strength. Julie Bean recommends applying a bit of glue to secure beads and wire ends.
Stress-test your creations to ensure they can handle weight. Refer to the table below for weight limits based on gauge wire. For outdoor displays, consider weatherproofing techniques like sealing with clear coat.
| Wire Gauge | Maximum Weight (oz) |
|---|---|
| 24g | 2 |
| 26g | 1.5 |
| 18g | 5 |
If you notice loose coils or beads, repair them promptly. Use pliers to tighten connections or add extra wire for stability.
Creative Variations and Customizations
Experiment with shapes like stars or angel figures for a festive touch. Incorporate mixed-media elements such as fabric or glitter for added texture. Scaling your designs for different display sizes is simple—adjust the gauge wire and loop sizes accordingly.
For a rustic look, try using painted wood beads. If you’re going for elegance, opt for crystal rondelles. The possibilities are endless, so let your imagination guide you.
By combining durability techniques with creative ideas, you’ll craft stunning pieces that stand out. Whether you’re decorating a tree or making wearable art, these tips will elevate your designs.
Conclusion
Bring your creative ideas to life with wire-wrapped designs. You’ve learned essential skills like forming a loop, controlling tension, and planning layouts. These techniques are not just for decorations—they’re perfect for making unique jewelry pieces too.
Experiment with different materials and scales to add variety to your projects. Try making snowflakes or dimensional shapes for your Christmas tree. These designs can also be sold as handmade crafts or given as thoughtful gifts.
For long-lasting results, ensure your pieces are durable. Use the right gauge wire and reinforce connections. Don’t forget to check out resources at beadaholique.com for more inspiration.
Share your creations online with specific hashtags to connect with other crafters. Whether you’re decorating your tree or starting a jewelry venture, the possibilities are endless. Keep crafting and let your creativity shine!