Transform plain panes into eye-catching focal points using accessible materials and simple methods. This approach lets you mimic the elegance of historic cathedral windows without specialized tools or advanced skills. Whether refreshing a kitchen accent or designing a statement piece, the process blends creativity with practicality.
Unlike traditional methods requiring molten metal and hand-cut pieces, modern techniques rely on peel-and-stick lead strips and specialized paints. These materials create depth and texture while reducing project time from weeks to days. Beginners can achieve polished results by focusing on strategic color blending and precise line work.
Success starts with planning. Sketch your pattern first, considering how light interacts with translucent hues. Opt for acrylic-based glass paints for easy cleanup and layering effects. The right combination of matte and glossy finishes adds authenticity to your finished work.
This guide walks through every stage, from surface prep to final sealing. You’ll learn how to balance intricate details with time-saving shortcuts, ensuring your project shines for years. Let’s explore how to turn ordinary windows into custom art that captivates at first glance.
Inspiration and Overview
Bring vibrant artistry into everyday spaces by reimagining how light and color interact with surfaces. This method lets you capture the charm of centuries-old craftsmanship through modern materials, making intricate patterns achievable for any skill level. Whether adding privacy to a bathroom or crafting a sunlit centerpiece, the results blend function with breathtaking style.
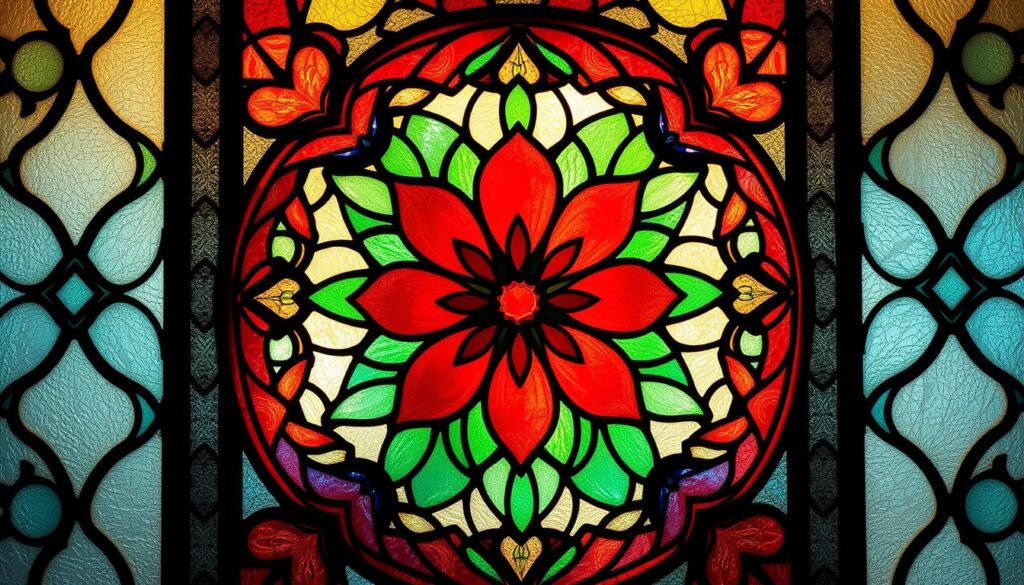
Discover the Beauty of Faux Stained Glass
Think beyond traditional church windows. Modern adaptations let you apply these designs to cabinet doors, room dividers, or even framed wall art. Translucent paints like Gallery Glass create fluid, light-catching effects, while brands such as Martha Stewart offer richer color varieties for bold statements. The key lies in balancing opacity and transparency to mimic genuine glasswork.
Understanding the Process and Vision
Peel-and-stick lead strips form the backbone of your design, creating crisp lines that resemble authentic soldered joints. When paired with strategic paint layering, they produce depth that tricks the eye into seeing textured panels. For example, this step-by-step faux stained glass project demonstrates how adhesive strips and careful brushwork transform flat surfaces.
Light plays a starring role. Morning sun will cast different hues than afternoon rays, so test samples at various times. Thinner paints allow more glow-through, ideal for mimicking antique pieces, while denser formulas work for modern geometric patterns. Mastering these nuances helps your creation feel like a professional installation.
Essential Materials and Tools for Your Project
Equip yourself with the essentials needed to craft vibrant, light-filtering artworks at home. Quality materials ensure smooth application and lasting results, whether you’re restoring an old window or designing new decor.
Gathering Glass Panels, Paints, and Lead Strips

Start with glass panels from local suppliers or repurposed frames. Choose smooth, clean surfaces free of scratches. For paints, Gallery Glass brands offer optimal translucency and easy blending compared to thicker options that dry cloudy.
Adhesive lead strips come in multiple widths (3mm–9mm) to match design complexity. Narrow sizes outline delicate patterns, while wider strips create bold borders. Keep scissors sharp for clean cuts and a ruler handy for precise measurements.
| Brand | Opacity | Drying Time | Best For |
|---|---|---|---|
| Gallery Glass | Translucent | 6-8 hours | Light effects |
| Martha Stewart | Semi-Opaque | 4-6 hours | Bold designs |
| DecoArt | Sheer | 2-3 hours | Layered textures |
Additional Supplies: Markers, Scissors, and Rulers
Use washable markers to sketch patterns on craft paper before transferring to your glass panel. A t-square ensures geometric accuracy, while toothpicks and stencil brushes add texture to glass paint before it sets.
Specialty items like liquid leading refine strip edges, and glass bevels elevate authenticity. Secure these accents with Loctite Adhesive for durability. Keep multiple brushes on hand—flat tips cover large areas, while liners detail intricate sections.
Mastering Creating Faux Stained Glass with Glass Paint and Lead Striping
Elevate your DIY projects with expert methods for flawless lead strip placement and paint flow. A meticulous approach ensures crisp patterns and professional-grade results, even for first-time creators.
Designing and Preparing Your Layout
Start by tracing your panel outline onto backdrop paper. Use a t-square to align edges perfectly. Sketch patterns with washable markers, keeping lines bold enough to see through the glass.
Flip the paper and place your panel over it. This reverse method prevents smudging while transferring the design. For curved shapes, roll the marker slightly to maintain consistent thickness.
Proper Application of Lead Strips and Adhesives
Cut strips 1/4″ longer than needed—trim excess after positioning. Press them into place using the stylus tool, focusing on edge adhesion. Overlap joints at corners for structural stability.
When meeting existing lead pieces, angle cuts at 45 degrees. This creates seamless intersections that mimic authentic soldered joints. Wipe away adhesive residue immediately with rubbing alcohol.
Step-by-Step Painting Techniques
Begin at the top of your panel to control drips. Outline each section with paint using steady hand pressure. Let gravity pull pigments downward as you fill areas from top to bottom.
Use the bottle tip to spread base layers, then switch to flat brushes for even texture. Rotate the panel frequently to check for thin spots. Allow 4 hours between coats for proper curing.
Expert Tips, Techniques, and Troubleshooting
Refine your craft with pro strategies that elevate designs from basic to breathtaking. These methods solve common challenges while adding museum-worthy details to your work.

Enhancing Texture and Color Mixing
Boost visual depth by manipulating paint before it dries. Dab stencil brushes for frosted effects or drag paper clips through wet layers for etched lines. For marbled swirls, drop white dots into Gallery Glass hues and twist with toothpicks.
Mix metallic shades into base colors for light-catching richness. Apply darker tones along panel edges and blend inward using flat brushes. This creates natural shadows that mimic antique glasswork.
| Tool | Technique | Effect |
|---|---|---|
| Stencil Brush | Dabbing Motions | Frosted Texture |
| Flat Brush | Side-to-Side Wiggling | Organic Patterns |
| Paper Clip | Straight Dragging | Linear Dimension |
Preventing Common Pitfalls and Fixing Issues
Avoid thin coats that crack under light. Apply paint thickly from top to bottom, reloading your brush often. If bubbles form, pop them with needles before drying.
Fix uneven sections by scoring edges with razor blades and peeling. Reapply glass paint after cleaning residue. For gaps between lead strips, fill with pewter outliner using steady hand pressure.
Explore copper foil methods for intricate designs requiring precise joints. Seal finished pieces with UV-resistant spray to prevent fading.
Conclusion
Your finished glass panels now stand ready to elevate any space. Use mirror clips for secure mounting or rest them on window ledges for quick displays. Lightweight designs let you swap seasonal pieces effortlessly—think spring florals or winter snowflakes.
Maintain brilliance with gentle cleaning. Wait 48 hours for full curing, then wipe surfaces using paper towels and ammonia-free sprays. Avoid scrubbing lead strips to preserve crisp lines.
This method merges artistry with practicality. You’ve learned to balance bold designs with durable materials, creating pieces that adapt to your evolving style. Share your skills—host workshops to teach friends how paint and patience produce gallery-worthy results.
Every project proves accessible crafts yield professional impacts. Whether crafting kitchen accents or statement window art, your work transforms light into dynamic color stories. Now go brighten those panes—your home deserves that radiant touch.